Live Data With jQuery Grid, WebSockets, and KnockoutJS
There are numerous scenarios when from for the sole purpose of having an effective or functional application it seems the only way to go is live – like live data, updating clients in real time.
There are numerous scenarios when from for the sole purpose of having an effective or functional application it seems the only way to go is live – like live data, updating clients in real time.
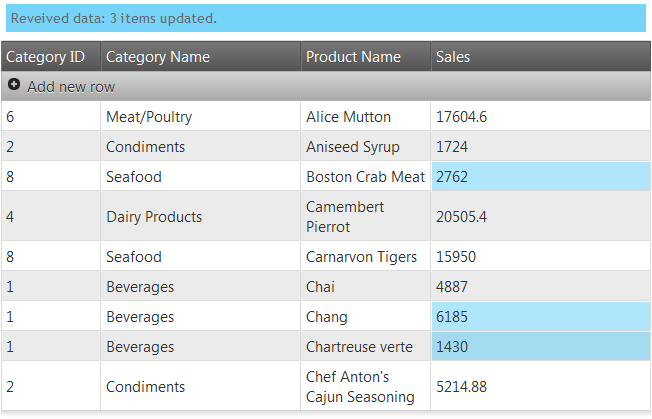
It just feels like that is how things are supposed to be done. Users themselves have pretty much gotten used to dynamic web applications. Just to get your imagination going, here’s a screenshot of the application demonstrated below (just keep in mind this stillness really doesn’t do it justice):

The ability to deliver such app, however, relies on client-side logic like the jQuery widgets or some help (thus communication) from the server. The correct term for that would be ‘polling’ (follow this to read more on Wikipedia) and it is the process of client constantly asking the server “Got something new for me yet?”. And that happens over and over. The thing is it produces extra traffic and also makes the server handle a whole bunch of requests just to say: “No”. That might become a thing of the past (looking at mobile devices) with push technology (or simply put – notifications). Mobile OS support such services (see Apple and Windows Phone call it push notifications, Android calls those cloud to device messaging) and there are a few techniques (such as HTML streaming that would not close a connection but rather keep it open in a loop). Then there’s also….
WebSockets
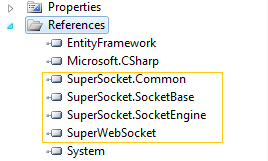
WebSocket is web technology providing for a full-duplex – meaning a non-blocking simultaneous two way communication. They of course come with API and are useable for both client and server. The protocol itself has seen a few changes and is standardized by the IETF as RFC 6455. The ability to maintain 2-way transfer over a single TCP connection (one socket) makes it very appealing as it would reduce the number of connections. And, yes, following the problem explained above, WebSocket protocol can provide the server with the means to send data to the client without the need for it to be requested or polled for. This is what I would try to show you in this blog – a way to piece this protocol along with two popular client controls for an awesome app. Now since the protocol has been through changes that are still a lot of implementations that are not up to date out there. Browsers are another gotcha as not all of them support the protocol ( Chrome and Firefox do, along with the soon-to-be IE10). That is still a pretty decent chunk of the browsers and should you that be good enough for you, you can enjoy the benefits of an unobtrusive connection that also has some security tricks with the latest versions. I’ve seen pretty nice .NET or even Node.js implementations and surely you will find a suitable one for you language of choice. There’s even a brand new and shiny namespace called ‘System.Net.WebSockets’ in the .NET framework 4.5! I’ve chose an open source implementation as it would not require framework update if you don’t have it and it support the latest version (the one you would find in the latest Chrome or Firefox browsers) along with older versions. It’s called SuperWebSocket and you can find it on CodePlex: http://superwebsocket.codeplex.com/. The server side in my case is just here to support my demo, so keep that in mind the implementation is far from perfect or actually usable on a large scale. The server is built on an extensible framework so you will find a few references in my demo:

Here’s the configuration section and the initialization:
<configuration>
  <configSections>
    <section name="socketServer" type="SuperSocket.SocketEngine.Configuration.SocketServiceConfig, SuperSocket.SocketEngine"/>
  </configSections>

  <socketServer>
    <servers>
      <server name="SuperWebSocket"
              serviceName="SuperWebSocket"
              ip="Any" port="2011" mode="Sync">
      </server>
    </servers>
    <services>
      <service name="SuperWebSocket"
               type="SuperWebSocket.WebSocketServer, SuperWebSocket" />
    </services>
  </socketServer>
<!--The rest is omitted-->
This is of course called just once on application start (the event or whatever equivalent the server environment provides). . Also you can hook up the events and handle connections and data transfer quite easily. Here’s how we send the initial data(coming from the generated LINQtoSQL classes from a local Northwind database) to the client on establishing a session rather than with the view itself:
private void StartWebSockServ()
{
    SocketServiceConfig config = ConfigurationManager.GetSection("socketServer") as SocketServiceConfig;
    // initialize with the above configuration
    if (!SocketServerManager.Initialize(config))
        return;
    // get an instance and set up:
    var socketServer = SocketServerManager.GetServerByName("SuperWebSocket") as WebSocketServer;
    HttpContext.Current.Application["WebSocketPort"] = socketServer.Config.Port;
    //set up the event handlers
    socketServer.NewSessionConnected += new SessionEventHandler<WebSocketSession>(Controllers.HomeController.socketServer_NewSessionConnected);
    socketServer.SessionClosed += new SessionEventHandler<WebSocketSession, SuperSocket.SocketBase.CloseReason>(Controllers.HomeController.socketServer_SessionClosed);
    socketServer.NewDataReceived += new SessionEventHandler<WebSocketSession, byte[]>(Controllers.HomeController.socketServer_NewDataReceived);
    socketServer.NewMessageReceived += new SessionEventHandler<WebSocketSession, string>(Controllers.HomeController.socketServer_NewMessageReceived);

    if (!SocketServerManager.Start())
        SocketServerManager.Stop();
    //start ticking data broadcast
    Controllers.HomeController.timer = new Timer(new TimerCallback(Controllers.HomeController.DataBroadcastOnChange));
    Controllers.HomeController.timer.Change(10000, 10000);
}
As you can notice I don’t really have live data (and I didn’t feel making a Twitter/Facebook reader) so I resided to a simple timed event and generating some random changes in the data and I will spare you that part. In an actual application the following should be handling some event in your data layer:
public static void socketServer_NewSessionConnected(WebSocketSession session)
{
    NorthWindDataContext nw = new NorthWindDataContext();
    JavaScriptSerializer serializer = new JavaScriptSerializer();
    session.SendResponse(serializer.Serialize(nw.Sales_by_Categories.Take(20)));
}
This is basically all you need to have data pushed from the server, yet still you can handle message received to take advantage bi-directional connection and… for example save changes made on one client and send them to all others!
The Client
The client side implementation to handle WebSocket communication is quite simple and it somewhat follows the logic in the events on the server – connected / data received / disconnected:
public static void DataBroadcastOnChange(object state)
{
    //pretend we got changes from some service while really generating randoms:
    List<Sales_by_Category> changes = GetDataChanges();
    //send it back to the clients
    WebSocketServer socketServer = SocketServerManager.GetServerByName("SuperWebSocket") as WebSocketServer;
    var sessions = socketServer.GetAllSessions();
    JavaScriptSerializer serializer = new JavaScriptSerializer();
    //broadcast the changes to all clients (if any)
    foreach (WebSocketSession session in sessions)
    {
        session.SendResponse(serializer.Serialize(changes));
    }
}
Note the port is the same as the server configuration and that the data we receive will be in the event parameter of the ‘onmessage’ event. Before you handle the data some preparations are in order, since it’s the point where we consider what to do with our data. The goal is an application with a client that just feels alive and we already provided the basic data feeding plumbing but just displaying the initial data doesn’t really cut it right? Sure we can do that with powerful jQuery Grid and it probably wouldn’t hesitate to ditch the initial data and display the new one in a snap, but that is just not a very graceful solution and above is already a hint that we just want to send in the changed records rather than the whole thing again. So we shall, and we can take advantage of some neat additions to the Infragistics jQuery toolset coming with 12.1 – an extension for our Data Source and Grid widgets that provides support for
Knockout!
No beating involved – Knockout.js is a JavaScript library that provides support for the MVVM design pattern and simplifies the creation of dynamic UI and that just makes it perfect for our demo project. If you want to have a look at what it is and what it can do check out http://knockoutjs.com/ with plenty of live examples and tutorials. First and foremost you will need the library( make sure you also grab the Mapping) which you can grab form the site or you can download it NuGet too. Then add links to the scripts along with jQuery (and UI) in your code and our own Loader widget. Now it’s time to create our model – already mentioned we’re using data from Northwind and that is the ‘Sales by Category’ View and this is the data format it contains:
$(document).ready(function () {
    //web socket handling
    if ('WebSocket' in window) {
        connect('ws://localhost:2011/');
    }
    else {
        alert("WebSockets don't seem to be supported on this browser.");
    }

    function connect(host) {
        ws = new WebSocket(host);
        ws.onopen = function () {
            notify('Connected!');
        };

        ws.onmessage = function (evt) {
            // handle data in evt.data
        };

        ws.onclose = function () {
            notify('Socket connection was closed!!!');
        };
    };
});
And then you create your view model with an observable collection of those items like so:
function Item(categoryID, categoryName, productName, productSales) {
//the unique key here is the prodcut name!
    return {
        categoryID: ko.observable(categoryID),
        categoryName: ko.observable(categoryName),
        productName: ko.observable(productName),
        productSales: ko.observable(productSales)
    };
};
Keep in mind the ‘jsonData’ is populated when we get data from the server, more on that below. So far we have our data and our model and we can start creating the UI by adding
The Grid
Start by setting the loader widget and this time except the grid add the paths to the two extension files for the knockout.js support:
function ItemsViewModel() {
    var self = this;

    self.data = ko.observableArray([]);

    for (var i = 0; i < jsonData.length; i++) {
        self.data.push(new Item(jsonData[i].CategoryID, jsonData[i].CategoryName, jsonData[i].ProductName, jsonData[i].ProductSales));
    }
}
Notice the Updating feature *is required* for the knockout support. Now you can use Knockout’s “data-bind” attribute to define the Grid:
$.ig.loader({
    scriptPath: "../../Scripts/js/",
    cssPath: "../../Content/css/",
    resources: "igGrid.Updating,extensions/infragistics.datasource.knockoutjs.js,extensions/infragistics.ui.grid.knockout-extensions.js"
});
As you can see the grid definition style remains the same in the brackets and after it has been created you can use all the API methods you normally would.
Binding It All Together
What is left to do is of course to feed the data to our model and let Knockout and the Grid handle the rest. There are some minor things to get clear though. Firstly, I am generating random changes as mentioned and since I also want to send just the changed items over the very same connection I needed a way to distinguish one from another so I just add an empty first record to mark updates(checking for null primary key, which can’t come from the database). That is however my quick and dirty solution, you can have your own or use the WebSocket connection for updates only. In the snippet below you will see some of the Knockout utility toolset in action used to get me an item ID from the collection by providing the primary key and some Grid API used to get the updated cell and make it flash a bit to make it clear to the user that value has just changed. The WebSocket ‘onmessgae’ event now looks like that:
<table id="grid"
       data-bind="igGrid: {
                    dataSource: data, width: 650, primaryKey: 'productName', autoCommit: true,
                    features: [ {
                        name: 'Updating', editMode: 'row',
                        },
                        {
                        name: 'Paging', pageSize: 10,
                        }
                    ],
                    enableHoverStyles: false,
                    autoGenerateColumns: false,
                    columns: [
                        {key: 'categoryID', headerText: 'Category ID', width: 100, dataType: 'number'},
                        {key: 'categoryName', headerText: 'Category Name', width: 200, dataType: 'string'},
                        {key: 'productName', headerText: 'Product Name', width: 130, dataType: 'string'},
                        {key: 'productSales', headerText: 'Sales', width: 170, dataType: 'number'}
                    ]}"></table>
Aside form a few minor tweaks like custom notification function and some css styles, this was what the app is made of. And since the connection (after the initial) is used for updates, it’s not such a big issue if it drops – based on the event handling we defined the result would be:

But then again the grid will remain functional and you can use provide a method to attempt to reconnect to make this app well-rounded and functional.
Wrapping Up
We’ve seen how you can create a application filled with motion – with live data feed handled by WebSocket connection, an observables-based KnockoutJS model and stepping on that, our jQuery Grid displaying and reflecting dynamically the changes to keep you client side always up-to-date with the actual data in a natural way and with pleasing experience for the user!
Since screenshots just don’t cut it here I have a small video hopefully coming soon and the demo project once our first release for 2012 is a fact. Stay tuned!