Getting Started With JavaScript Unit Testing Using Qunit
It’s usually good practice to have automated unit tests while developing your code. In unit testing, we test the smallest unit of the code for a particular behaviour. The Unit test helps us to find bugs in the code early in the development cycle.
Essentially, a unit test is the piece of code which verifies the behaviour of a particular unit of the code in the development phase. Unit tests can be run by the test runner multiple times to verify the behaviour of a particular unit of code for different sets of input. Nowadays, most application developers adhere to Agile and TDD approach.
In the test driven development approach, you first write a unit test, and when it fails, you then write an application code to pass the test. In JavaScript, unit testing is not much different than other programming languages. To do unit testing or TDD in JavaScript, you need a testing framework. There are many popular JavaScript testing frameworks available, including:
- Mocha
- Jasmine
- QUnit
- JSUnit
In this post, we will focus on QUnit, a unit testing framework provided by the jQuery team. It provides a rich set of test assertions, highly informative test suite UI, support of synchronous and asynchronous call back, support of test module, and more. In this post, we’ll cover the following:
- Writing the first unit test
- Understating the test suite UI
- A look into the assertions
- Grouping the tests
Writing the First Test
Let’s start with setting up the QUnit for the JavaScript unit testing. You need to add a reference to the two QUnit files on the HTML page. Either you can have files locally in the project or you can use the reference of the jQuery CDN. I am going to use the CDN option as shown below:
Source file
<head>
    <title>Test Page</title>
    <link rel="stylesheet" href="//code.jquery.com/qunit/qunit-1.16.0.css">
    <script src="//code.jquery.com/qunit/qunit-1.16.0.js"></script>
</head>
Next you need two div in the body of the HTML page, and one must have the id qunit.
Source file
1 <body>
2  <div id="qunit"></div>
3  <div id="qunit-fixture"></div>
4 </body>
We have added reference of qunit.js and qunit.css to set up the test environment. Qunit.js is the test runner and testing framework, and qunit.css provides style to the test suite page.

Now let’s go ahead and write a basic test. I am writing the tests in the separate test.js file and added reference of the file in the HTML page. A basic hello test is written as shown below:
Source file
QUnit.test("hello test", function (assert) {
     assert.ok(1 == "1", "Passed!");
});
QUnit.test takes two input parameters. The first parameter is the name of the test, and the second parameter is a function. The function contains the test code, and it can contain any number of assertions.

In the above test, I have included a simple ok assertion. The ok assertion will assert true, if the argument evaluates to true. It also takes the string input parameter to display the test result message. When we go ahead and run the test, we should get the output as shown below:

In the test suite, QUnit is giving the message that one out of one tests has passed. Now let’s change the test to make it fail and examine how QUnit gives information about the failed test. I have modified the test as shown below:
Source file
QUnit.test("hello test", function (assert) {
    assert.ok(1 == "2", "Passed!");
});
Once again, when I run the test, QUnit will give information about failed test in the test suite as shown below:

For the failed test, QUnit is giving us following information:
- Expected result
- Actual result
- Difference
- Source of failed test
Using this information we can easily find the source and reason of the failed test.
Understanding the Test Suite UI

In the test suite, QUnit will display the tests results. The header of the test suite displays the test page title, and below the header you will either find a green or red bar. The green bar indicates all the tests have passed, while the red bar indicates that at least one test has failed. Below the bar there are three check boxes:
- Hide passed tests
- Check for globals
- No try-catch
You can hide all the passed tests from the test suite by checking the first box. This is very useful when you have a lot of tests and you want to find few failed tests in the set.
When you check the Check for globals checkbox, you instruct QUnit to make a list of all the windows object property before and after the test execution. QUnit will check for the differences, and if it encounters any, the test will fail.
By checking the No try-catch checkbox, you can instruct QUnit to throw a native exception when the test throws the exception. In this option, QUnit will make sure that when the test runner dies due to an exception in the tests, it throws a native exception in the browser, which can be useful in the debugging.
Below the check box header, a blue bar displays information about the navigator.userAgent. Below the blue bar there is a test summary, which gives us information about the total time taken to run all the tests. It also gives information about the number of failed assertions and passed assertions.
Below the test summary are the test results, which are displayed in number form with the test name next to the number. Next to the test name in the braces number of passed assertion, the number of failed assertion and total number of assertions are displayed. In the right corner you will find the time taken by the particular test. In the test result for each failed assertion expected result, actual result, difference and the source of failed test is displayed.
Assertions
QUnit provides us different kinds of assertions. Assertions are the most important component of unit testing. In a test, we assert the expected result with the actual result, and the testing framework compares these two results to produce the results. QUnit provides us around 13 assertions, including:
- ok()
- equal()
- deepEqual()
- async()
- expect()
- notDeepEqual()
- notEqual()
- notPropEqual()
- notStrictEqual()
- propEqual()
- push()
- throws()
- strictEqual()
In the next section we will take a look at two of these and focus on assertions in further articles. The simplest of the assertions is ok(). It takes two arguments: the first is the expression to be evaluated and the optional second argument is the test result message.

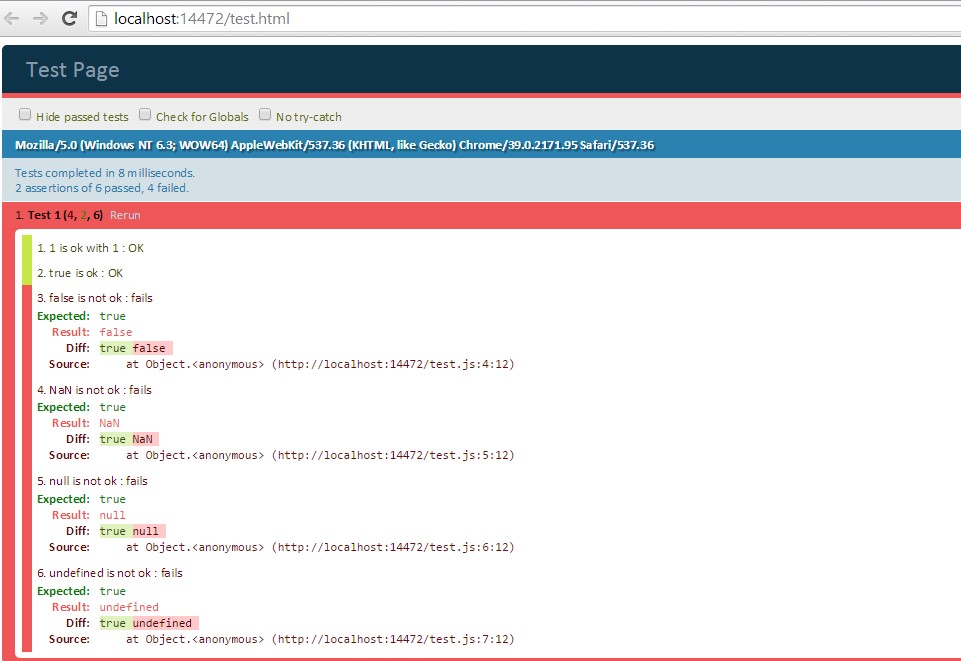
If the expression passed because the first argument evaluates to true, the assert passes or else it fails. Some of the ok assertion is show below:
Source file
QUnit.test("Test 1", function (assert) {
    assert.ok(1 == "1", "1 is ok with 1 : OK");
    assert.ok(true, "true is ok : OK");
    assert.ok(false, "false is not ok : fails");
    assert.ok(NaN, "NaN is not ok : fails");
    assert.ok(null, "null is not ok : fails");
    assert.ok(undefined, "undefined is not ok : fails");
});
In the test suite you can see that for NaN, undefined and null etc. ok assertion fails.

Let us take a look at the equal assertion. The equal assertion uses the == operator to compare the actual and expected arguments. In takes two required and one optional arguments. The first argument is the actual value, the second is the expected value, and the optional third argument is the test result message.
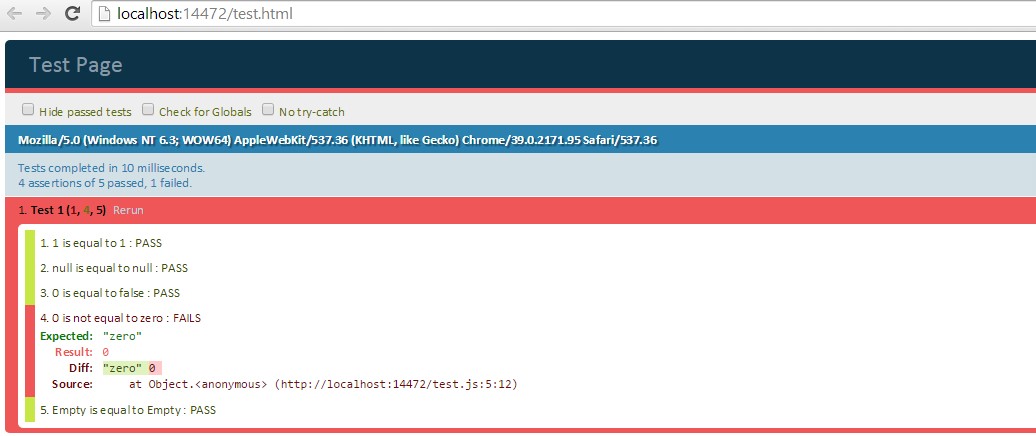
Some of the equal assertion is shown below. Here I am passing two arguments to test whether they are equal or not:
Source file
QUnit.test("Test 1", function (assert) {
     assert.equal(1,1, "1 is equal to 1 : PASS");
     assert.equal(null,null, "null is equal to null : PASS");
     assert.equal(0,false, "0 is equal to false : PASS");
     assert.equal(0, "zero", "0 is not equal to zero : FAILS");
     assert.equal("", "","Empty is equal to Empty : PASS");
});
In the test suite you can see the behavior of the equal assertion.

Grouping the Tests
Tests can be logically grouped together using the QUnit.module(). A particular test group can run on their own. It’s a good idea to group tests together to avoid any side effects. Using the QUnit.module, tests can be grouped as shown below:
Source file
QUnit.module("Test Group 1");
QUnit.test("Test 1 TG1", function (assert) {
    assert.equal(1,1, "1 is equal to 1 : PASS");
});
QUnit.test("Test 2 TG1", function (assert) {
     assert.ok(true, "this test will return true : PASS");
});

QUnit.module("Test Group 2");
QUnit.test("Test 1 TG2", function (assert) {
     assert.equal(null,null, "null is equal to null : PASS");
});
QUnit.test("Test 2 TG2", function (assert) {
    assert.ok(false, "this test will return true : FAIL");
});
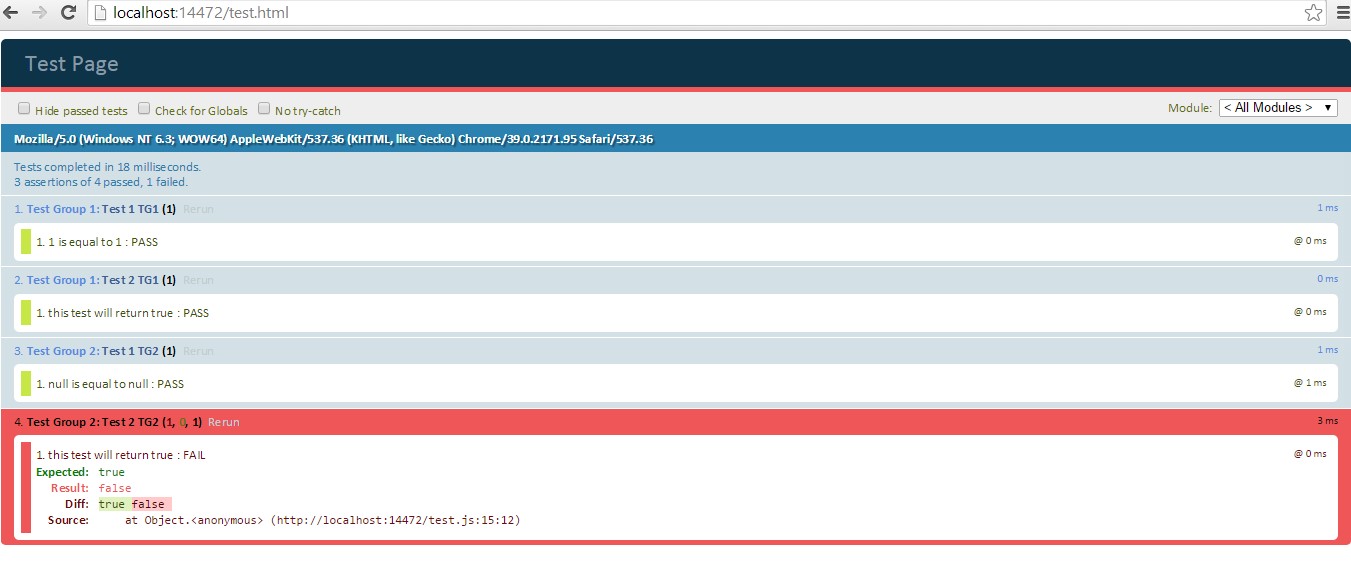
In the test suite UI, you can view the test results as grouped in the test group.

You can also filter to view the test results of a particular test group by selecting a test group from the drop down below the red/green bar.
Conclusion
In this post we started with JavaScript unit testing with QUnit. We learned to write our first unit test, discussed the test suite UI, explored the different kinds of assertions, and reviewed test grouping. Stay tuned for future articles where we’ll discuss other unit testing and QUnit topics in detail.