Getting Started with Master-Detail Layout Using Ignite UI for Angular Grid
The master-detail layout is a proven UI pattern that provides a straightforward, scalable, and user-friendly way to present related data without overwhelming the screen. Learn more in this article.
When building enterprise applications (such as CRMs, ERPs, and admin dashboards), it’s common to work with relational datasets where one record is linked to multiple related records. For example, an order might have various items, a customer might have multiple transactions, or a department might have numerous employees.
The Master-Detail Layout is a proven UI pattern for these scenarios. It provides a straightforward, scalable, and user-friendly way to present related data without overwhelming the screen.
In this article, we’ll walk you through building a clean, efficient master-detail interface using Ignite UI for Angular. We’ll explore its powerful Grid component and its built-in support for nested templates using igxGridDetail, helping you display hierarchical data with minimal setup and high performance.
What Is a Master-Detail Layout?
A Master-Detail Layout (also known as parent-child or expandable rows) is a design pattern where a top-level list (master) allows users to expand items to reveal related information (detail). Common examples include:
- Orders (master) with Order Items (detail)
- Users (master) with Profile Logs (detail)
- Departments (master) with Employees (detail)
This pattern enhances usability by reducing screen clutter while providing access to deeper data when needed.
Setting Up the Angular Project
Before diving into the master-detail implementation, let’s set up a clean Angular workspace for our demo.
1. Create a New Angular Project
If you don’t already have an Angular workspace ready, create one using the Angular CLI. Open this project in your preferred IDE or editor to begin.
ng new master-detail-grid
2. Add Ignite UI for Angular
Ignite UI for Angular offers powerful UI components, including the igxGrid we’ll use for the master-detail layout. Here’s how to add it.
ng add igniteui-angular
3. Generate a Dedicated Demo Component
To keep your master-detail example modular, generate a dedicated Angular component.
ng generate component pages/grid-demo
4. Configure Routing for the Demo
To simplify navigation, replace your existing app.routes.ts (or your routing module) with a minimal setup that redirects to your demo component by default:
import { Routes } from '@angular/router';
export const routes: Routes = [
  { path: '', redirectTo: '/demo', pathMatch: 'full' },
  { path: 'demo', loadComponent: () => import('./pages/grid-demo/grid-demo.component').then(m => m.GridDemoComponent) },
  { path: '**', redirectTo: '/demo' }
];
Setting Up the Data
Before we build the master-detail layout, it’s essential to prepare your data. This ensures your grid components have meaningful content to display and can efficiently fetch related detail data as users interact with the UI.
You can use any data source with Ignite UI for Angular:
- Static/local data – from a JSON file in your assets folder.
- Remote API data – fetched via Angular’s HttpClient from a backend service.
- Mocked data – for development, generated in the service itself.
In this example, we’ll integrate with a custom Northwind Swagger API. The concepts remain the same regardless of your data source structure.
1. Define Your Models
To enforce type safety and clarity, define TypeScript interfaces representing the data shapes in a dedicated models.ts file.
export interface Customer {
  customerId: string;
  companyName: string;
  contactName: string;
  country: string;
}
export interface Order {
  orderId: number;
  customerId: string;
  orderDate: string;
  shipAddress: string;
  freight: number;
}
export interface OrderDetail {
  orderId: number;
  productId: number;
  quantity: number;
  unitPrice: number;
}
2. Create a Data Service
Centralize all data-fetching logic in an Angular service, e.g., northwind-swagger.service.ts. Here’s a sample service that interacts with a custom Northwind API, which we’ll use in this example, and includes basic error handling:
const API_ENDPOINT = 'https://data-northwind.indigo.design';
@Injectable({
  providedIn: 'root'
})
export class NorthwindSwaggerService {
  constructor(private http: HttpClient) {}
  public getCustomerDto(id: string): Observable<Customer | undefined> {
    return this.http.get<Customer | undefined>(`${API_ENDPOINT}/Customers/${id}`)
      .pipe(catchError(this.handleError<Customer | undefined>('getCustomerDto', undefined)));
  }
  public getCustomerDtoList(): Observable<Customer[]> {
    return this.http.get<Customer[]>(`${API_ENDPOINT}/Customers`)
      .pipe(catchError(this.handleError<Customer[]>('getCustomerDtoList', [])));
  }
  public getOrderWithDetailsDtoList(id: string): Observable<Order[]> {
    return this.http.get<Order[]>(`${API_ENDPOINT}/Customers/${id}/Orders/WithDetails`)
      .pipe(catchError(this.handleError<Order[]>('getOrderWithDetailsDtoList', [])));
  }
  private handleError<T>(operation = 'operation', result?: T) {
    return (error: any): Observable<T> => {
      console.error(`${operation} failed: ${error.message}`, error);
      return of(result as T);
    };
  }
}
With your models and service prepared, the grid components can now bind directly to arrays of orders per selected customer. From here, we’ll move on to designing the Master Grid and progressively add detail views, custom templates, and performance optimizations.
Designing the Master Grid
Now that our data service is ready, it’s time to build the master-detail UI step by step. We’ll start by selecting a customer, displaying their orders in a master grid, and then enhancing the grid with a customizable detail template.
1. Adding a Combo to Select Customers
To allow users to pick a customer, we’ll use the igx-simple-combo component that asynchronously loads customer data from the service.
- When a user selects a customer, we update a local variable localCustomerId in the component.
- This triggers fetching the corresponding orders for that customer.
<igx-simple-combo
        type="border"
        [data]="northwindSwaggerCustomerDto"
        displayKey="customerId"
        (selectionChanging)="localCustomerId = $event.newValue.customerId"
         class="single-select-combo">
    </igx-simple-combo>
public northwindSwaggerCustomerDto: CustomerDto[] = [];
private _localCustomerId?: string;
public get localCustomerId(): string | undefined {
    return this._localCustomerId;
  }
  public set localCustomerId(value: string | undefined) {
    this._localCustomerId = value;
    this.selectedCustomer$.next();
    this.northwindSwaggerOrderWithDetailsDto$.next();
  }
 ngOnInit() {
this.northwindSwaggerService.getCustomerDtoList().pipe(takeUntil(this.destroy$)).subscribe(
      data => this.northwindSwaggerCustomerDto = data
    );
}

2. Adding the Master Grid for Orders
Once a customer is selected, we display their orders using an igx-grid. The grid’s data source is northwindSwaggerOrderWithDetailsDto, updated every time localCustomerId changes.
<igx-grid [data]="northwindSwaggerOrderWithDetailsDto" primaryKey="orderId" rowSelection="single" [hideRowSelectors]="true" [allowFiltering]="true" filterMode="excelStyleFilter" (rowSelectionChanging)="selectedOrder = $event.newSelection[0]" class="grid">
      <igx-column field="orderId" oldDataType="number" header="orderId" [filterable]="true" [sortable]="true" [selectable]="false"></igx-column>
      <igx-column field="customerId" oldDataType="string" header="customerId" [filterable]="true" [sortable]="true" required="true" [minlength]="1" [selectable]="false"></igx-column>
      <igx-column field="employeeId" oldDataType="number" header="employeeId" [filterable]="true" [sortable]="true" [min]="1" [max]="2147483647" [selectable]="false"></igx-column>
      <igx-column field="shipperId" oldDataType="number" header="shipperId" [filterable]="true" [sortable]="true" [min]="1" [max]="2147483647" [selectable]="false"></igx-column>
      <igx-column field="orderDate" oldDataType="date" header="orderDate" [filterable]="true" [sortable]="true" [selectable]="false"></igx-column>
      <igx-column field="requiredDate" oldDataType="date" header="requiredDate" [filterable]="true" [sortable]="true" [selectable]="false"></igx-column>
      <igx-column field="shipVia" oldDataType="string" header="shipVia" [filterable]="true" [sortable]="true" [selectable]="false"></igx-column>
      <igx-column field="freight" oldDataType="number" header="freight" [filterable]="true" [sortable]="true" [selectable]="false"></igx-column>
      <igx-column field="shipName" oldDataType="string" header="shipName" [filterable]="true" [sortable]="true" [maxlength]="100" [selectable]="false"></igx-column>
      <igx-column field="completed" oldDataType="boolean" header="completed" [filterable]="true" [sortable]="true" [selectable]="false"></igx-column>
</igx-grid>
private _selectedCustomer?: CustomerDto;
  public get selectedCustomer(): CustomerDto | undefined {
    return this._selectedCustomer;
  }
  public set selectedCustomer(value: CustomerDto | undefined) {
    this._selectedCustomer = value;
    this.selectedOrder = undefined;
  }
  public selectedCustomer$: Subject<void> = new Subject<void>();
  public northwindSwaggerOrderWithDetailsDto: OrderWithDetailsDto[] = [];
  public northwindSwaggerOrderWithDetailsDto$: Subject<void> = new Subject<void>();
  public selectedOrder?: OrderWithDetailsDto;
  ngOnInit() {
    this.northwindSwaggerService.getOrderWithDetailsDtoList(this.localCustomerId ?? '').pipe(takeUntil(this.destroy$)).subscribe(
      data => this.northwindSwaggerOrderWithDetailsDto = data
    );
    this.northwindSwaggerOrderWithDetailsDto$.pipe(takeUntil(this.destroy$)).subscribe(() => {
      this.northwindSwaggerService.getOrderWithDetailsDtoList(this.localCustomerId ?? '').pipe(take(1)).subscribe(
        data => this.northwindSwaggerOrderWithDetailsDto = data
      );
    });
  }

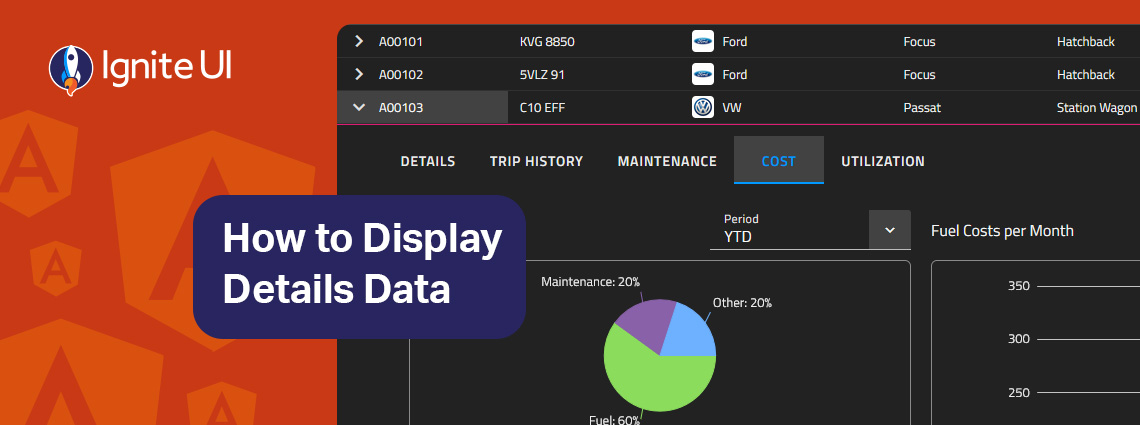
3. Adding a Custom Detail Template
To make the master grid more useful, we add a detail template for each order. This could contain product details, totals, or any related information. In our case, we’ll be using it to display some of the grid’s columns for address and additionally order details in a grid.
To configure the igxGrid to display in master-detail mode, you need to specify a template inside the grid, marked with the igxGridDetail directive:
<ng-template igxGridDetail> </ng-template>
You can customize this detail template with any components that fit your business needs: text, input groups, nested grids, or charts. Here we’ll use texts and a grid.
<ng-template igxGridDetail let-rowData>
        <div class="row-layout group_3">
          <div class="row-layout group_4">
            <div class="column-layout group_5">
              <p class="ig-typography__subtitle-1 text">
                Country
              </p>
              <p class="ig-typography__subtitle-1 text">
                Code
              </p>
              <p class="ig-typography__subtitle-1 text">
                City
            </p>
              <p class="ig-typography__subtitle-1 text">
                Street
              </p>
              <p class="ig-typography__subtitle-1 text">
                Phone
              </p>
            </div>
            <div class="column-layout group_6">
              <p class="ig-typography__subtitle-1 text">
                {{ rowData.shipAddress.country }}
              </p>
              <p class="ig-typography__subtitle-1 text">
                {{ rowData.shipAddress.postalCode }}
              </p>
              <p class="ig-typography__subtitle-1 text">
                {{ rowData.shipAddress.city }}
              </p>
              <p class="ig-typography__subtitle-1 text">
                {{ rowData.shipAddress.street }}
              </p>
              <p class="ig-typography__subtitle-1 text">
                {{ rowData.shipAddress.phone }}
              </p>
            </div>
          </div>
          <div class="column-layout group_7">
            <p class="text">
              Order Details
            </p>
            <igx-grid primaryKey="orderId" [allowFiltering]="true" filterMode="excelStyleFilter" [data]="rowData.orderDetails" class="grid_1">
              <igx-column field="orderId" oldDataType="number" header="orderId" [filterable]="true" [sortable]="true" [selectable]="false"></igx-column>
              <igx-column field="productId" oldDataType="number" header="productId" [filterable]="true" [sortable]="true" [selectable]="false"></igx-column>
              <igx-column field="unitPrice" oldDataType="number" header="unitPrice" [filterable]="true" [sortable]="true" [selectable]="false"></igx-column>
              <igx-column field="quantity" oldDataType="number" header="quantity" [filterable]="true" [sortable]="true" [selectable]="false"></igx-column>
              <igx-column field="discount" oldDataType="number" header="discount" [filterable]="true" [sortable]="true" [selectable]="false"></igx-column>
            </igx-grid>
          </div>
        </div>
      </ng-template>

Handling Data Binding
The context of the template is the master record data, so that values from the master record can be displayed in the detail template.
- The context is the master record that the detail belongs to.
- You declare a template context variable using the let- syntax, which lets you access the master record’s data inside the detail template.
- In our example, we use let-rowData to name this context variable.
This means inside the detail template, you can access any property of the master record through rowData. For instance, rowData.shipAddress.country and rowData.orderDetails accesses the order’s ID from the master grid’s record.
      <ng-template igxGridDetail let-rowData>
            <div class="column-layout group_6">
              <p class="ig-typography__subtitle-1 text">
                {{ rowData.shipAddress.country }}
              </p>
          <div class="column-layout group_7">
            <igx-grid primaryKey="orderId" [allowFiltering]="true" filterMode="excelStyleFilter" [data]="rowData.orderDetails" class="grid_1">
             /igx-grid>
          </div>
        </div>
      </ng-template>
Simple Dynamic Loading
In many cases, you don’t want to load all the detail data up front. Instead, you can fetch it on demand when a row is expanded.
Sometimes the detail data comes from a completely different endpoint and requires a parameter from the master record (for example, an order’s ID). In such cases, we can load the detail on demand when the row is expanded.
In this approach, every time a row is expanded, we request the detail data from the API using the master record’s ID.
<igx-grid [data]="northwindSwaggerOrderDto" primaryKey="orderId" [allowFiltering]="true" filterMode="excelStyleFilter" class="grid" (rowToggle)="onRowToggle($event)">
    <igx-column field="orderId" dataType="number" header="orderId" [filterable]="true" [sortable]="true" [selectable]="false"></igx-column>
    <ng-template igxGridDetail let-rowData>
      <ng-container *ngIf="getOrderDetails(rowData.orderId) | async as details">
        @for (item of details; track item) {
          <igx-input-group type="border" class="input">
            <input type="text" [(ngModel)]="item.orderId" igxInput />
          </igx-input-group>
        }
      </ng-container>
    </ng-template>
  </igx-grid>
getOrderDetails(orderId: number): Observable<any[]> {
      return this.northwindSwaggerService
    .getOrderDetailDtoList(orderId)
    .pipe(
      take(1)
    );
}
While straightforward, this approach triggers a new API call constantly after it’s been made visible. This could slow down the application and even cause it to crash.
Performance Optimization Tips
Repeatedly fetching the same detail data is costly in both performance and network usage. A simple and effective solution is to cache the data after it’s loaded for the first time.
private orderDetailsCache = new Map<number, Observable<any[]>>();
getOrderDetails(orderId: number): Observable<any[]> {
    if (!this.orderDetailsCache.has(orderId)) {
      const request$ = this.northwindSwaggerService
        .getOrderDetailDtoList(orderId)
        .pipe(
          take(1),
          shareReplay(1),
        );
      this.orderDetailsCache.set(orderId, request$);
    }
    return this.orderDetailsCache.get(orderId)!;
  }
How Does It Work?
- On the first expansion of a row, getOrderDetails() calls the API and stores the resulting observable in orderDetailsCache.
- This method will be called constantly, but because the method returns the cached observable, it prevents duplicate requests.
- The shareReplay(1) operator ensures that even if subscribers attach after the API call has completed, they receive the cached data immediately without triggering a new request.
This is easy to implement and significantly reduces the number of requests.
Wrap Up…
Building Master-Detail views in Angular doesn’t have to be complex or performance-intensive. With Ignite UI for Angular, you gain a powerful, elegant solution that requires minimal setup yet offers full flexibility and customization to fit your application’s unique needs.
Whether you are building admin dashboards, management systems, or data-driven interfaces, Ignite UI’s Angular grid gives you everything you need to develop fast, responsive, and maintainable applications.
You can check out our Ignite UI for Angular Grid samples and explore all the components and features used. The Fleet Management app demonstrates the use of Master-Detail Grid, so you can see how the data is presented and managed in real-world scenarios.