Version

Applying Appearances to WinCalculatorDropDown

An object’s Appearance determines how the object is displayed. Most objects can have their Appearance properties change to provide complete control over an object’s look.

Setting Appearances at Design-Time

To change the Appearance of the entire WinCalculatorDropDown™ control, expand the Appearance property on the property page and make the desired changes to its sub-properties. These changes apply to the entire element and any Appearance that has not been overridden by the ButtonAppearance property or individual button Appearances.

To change the Appearance of the Buttons group as a whole, expand the CalculatorButtonAppearance property on the property page and make the desired changes to its sub-properties. These changes will affect the properties for every button on the calculator that does not have an individual Appearance object.

To change the Appearance of individual buttons, expand the Buttons property and then the Appearance for an individual button on the property page and make the desired changes to its sub-properties. These changes apply for an individual button, overriding all preceding appearances. Make sure you set the UseOsThemes property to False to see the appearance changes you have made take effect. In addition, if you application is using Application Styling you should set the UseAppStyling property to False in order to see the changes you have made local on the control.

Setting Appearances at Run-Time

The following example code shows how to change the different Appearances of the WinCalculatorDropDown at Run-Time:

In Visual Basic:

Imports Infragistics.Win
...
Private Sub Applying_Appearances_to_Calculator_Controls_Load( _
  ByVal sender As System.Object, _
  ByVal e As System.EventArgs) Handles MyBase.Load
	' Set UseOsThemes and UseAppStyling to false so that gradients
	' will be applied that are created
	Me.ultraCalculatorDropDown1.UseOsThemes = DefaultableBoolean.False
	Me.ultraCalculatorDropDown1.UseAppStyling = False
	' Create the appearance objects in code
	Dim app1 As New Appearance()
	Dim app2 As New Appearance()
	Dim app3 As New Appearance()
	Dim app4 As New Appearance()
	' Set properties of the appearance1 in code
	app1.FontData.SizeInPoints = 25
	app1.BackColor = Color.White
	app1.BackColor2 = Color.Yellow
	app1.BackGradientStyle = GradientStyle.Circular
	app1.ForeColor = Color.DarkGreen
	app1.TextHAlign = HAlign.Right
	app1.Cursor = Cursors.Cross
	' Set propeties for the appearance2
	app2.BackColor = Color.Yellow
	app2.BackColor2 = Color.Green
	app2.BackGradientStyle = GradientStyle.BackwardDiagonal
	app2.FontData.Bold = DefaultableBoolean.True
	app2.FontData.Italic = DefaultableBoolean.True
	app2.TextHAlign = HAlign.Center
	app2.FontData.SizeInPoints = 15
	app2.Cursor = Cursors.Help
	' Add properties for appeareance 3
	app3.TextHAlign = HAlign.Center
	app3.BackColor = Color.DodgerBlue
	app3.BackColor2 = Color.Gainsboro
	app3.BackGradientStyle = GradientStyle.HorizontalBump
	' Add properties to the last appearance
	app4.BackColor = Color.Black
	app4.BackHatchStyle = BackHatchStyle.DarkVertical
	app4.AlphaLevel = 150
	app4.BackGradientStyle = GradientStyle.VerticalBump
	' Apply the appeareance for the buttonAppeareance,
	' overides calculator appearance
	' but does not overide individual button appearances
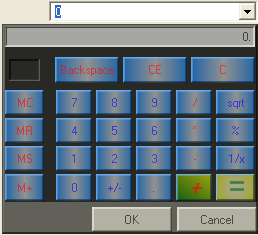
	Me.ultraCalculatorDropDown1.CalculatorButtonAppearance = app3
	' Set appearance for an individual button, overrides
	' all preceding appearances
	Me.ultraCalculatorDropDown1.Buttons("+").Appearance = app2
	Me.ultraCalculatorDropDown1.Buttons("=").Appearance = app1
	' Appearance for entire calculator, applies
	' to entire element and any appearance that
	' has not been overidden by
	' ButtonAppearance or individual button appearances
	Me.ultraCalculatorDropDown1.CalculatorAppearance = app4
End Sub

In C#:

using Infragistics.Win;
...
private void Applying_Appearances_to_Calculator_Controls_Load(object sender,
  EventArgs e)
{
	// Set UseOsThemes and UseAppStyling to false so that gradients
	// will be applied that are created
	this.ultraCalculatorDropDown1.UseOsThemes = DefaultableBoolean.False;
	this.ultraCalculatorDropDown1.UseAppStyling = false;
	// Create the appearance objects in code
	Infragistics.Win.Appearance app1 = new Infragistics.Win.Appearance();
	Infragistics.Win.Appearance app2 = new Infragistics.Win.Appearance();
	Infragistics.Win.Appearance app3 = new Infragistics.Win.Appearance();
	Infragistics.Win.Appearance app4 = new Infragistics.Win.Appearance();
	// Set properties of the appearance1 in code
	app1.FontData.SizeInPoints=25;
	app1.BackColor=Color.White;
	app1.BackColor2=Color.Yellow;
	app1.BackGradientStyle=GradientStyle.Circular;
	app1.ForeColor=Color.DarkGreen;
	app1.TextHAlign=HAlign.Right;
	app1.Cursor=Cursors.Cross;
	// Set propeties for the appearance2
	app2.BackColor=Color.Yellow;
	app2.BackColor2=Color.Green;
	app2.BackGradientStyle=GradientStyle.BackwardDiagonal;
	app2.FontData.Bold=DefaultableBoolean.True;
	app2.FontData.Italic=DefaultableBoolean.True;
	app2.TextHAlign=HAlign.Center;
	app2.FontData.SizeInPoints=15;
	app2.Cursor=Cursors.Help;
	// Add properties for appeareance 3
	app3.TextHAlign=HAlign.Center;
	app3.BackColor=Color.DodgerBlue;
	app3.BackColor2=Color.Gainsboro;
	app3.BackGradientStyle=GradientStyle.HorizontalBump;
	// Add properties to the last appearance
	app4.BackColor=Color.Black;
	app4.BackHatchStyle=BackHatchStyle.DarkVertical;
	app4.AlphaLevel=150;
	app4.BackGradientStyle=GradientStyle.VerticalBump;
	// Apply the appeareance for the buttonAppeareance,
	// overides calculator appearance
	// but does not overide individual button appearances
	this.ultraCalculatorDropDown1.CalculatorButtonAppearance=app3;
	//set appearance for an individual button, overrides
	// all preceding appearances
	this.ultraCalculatorDropDown1.Buttons["+"].Appearance=app2;
	this.ultraCalculatorDropDown1.Buttons["="].Appearance=app1;
	// Appearance for entire calculator, applies
	// to entire element and any appearance that
	// has not been overidden by
	// ButtonAppearance or individual button appearances
	this.ultraCalculatorDropDown1.CalculatorAppearance=app4;
}
example of wincalculator after applying above code