-
Create a new Windows Application project. You should see a single Windows Form.
-
Select the UltraTabControl control from the Visual Studio toolbox and add it to the form.
You will immediately see that the tab control has two distinct parts. At the top of the control is the tab header area. This is where the tabs will appear. Beneath that is the controls area which initially shows the shared controls page. This area contains controls that will be shared among tabs. It is visible now only because there are not yet any tabs in the control.
-
Click on the "[Shared controls page]" caption. you will see the highlighting change on the control. Look at the Visual Studio Property window (press F4 to open it if it is not currently displayed) and you will see that the name of the current control has changed. If your Tab control is named UltraTabControl1, the control now selected will be UltraTabSharedControlsPage1.
This introduces the concept of tab pages. In order to host controls, each tab that you create will have its own tab page, which is a special container control that is automatically created and destroyed by the Tab control on an as-needed basis. Although these controls do not exist independently of the WinTab control itself, you can access them as if they do.
In addition to having a page for each tab, the control has a single page for shared controls which can appear on multiple tabs. This is the page that is now visible and selected.
-
Click in the tab header area to re-select the Tab element itself (if you have the Property window displayed, you will see the name change. Then resize the Tab element so that it occupies most of the form, but leave room at the bottom so you can still place another small control on the form.
-
Currently, there are no tabs in the control. Invoke the context menu for the control and choose "Add Tab". Two things will happen. One is that a tab labeled "tab1" will appear in the tab header area. The other is that the label for the shared controls page will no longer be visible.
-
Click in the control area under the tab header. Look at the Property window and you will see that a new element has been created: UltraTabPageControl1. This is the control container page that corresponds to the new tab.
-
In the Toolbox, select the Windows Forms section, then double-click the Button control. You will see that a button is added not directly to your form, but to the tab control page that was selected. You could have accomplished the same thing by single-clicking the button tool and drawing the button onto the tab, just as you would onto a form.
-
Invoke the context menu for the control, and choose "Add Tab" again. This time, you will see "tab2" appear in the tab header area.
-
Click on the "tab2" header. You will see two things. One is that the visual appearance of the tabs changes to show that tab 2 is now active. You will also see the button you added disappear.
|
Note
|
Note
The tabs you create are active at design-time, and you can switch between them by clicking on their headers, just as the user would do at run-time. You can optionally select the control area to verify that the new tab page - UltraTabPageControl2 - has been created.
|
-
Return to the toolbox and select the TextBox tool. Drag it into the control area of the Tab element, positioning it near the top.
-
You now have two tabs with a different type of control on each one. You can easily switch between the two tabs by clicking on their headers. You will se that when a tab is selected, it’s control becomes visible.
But what about the shared control page that was visible when you first created the control? It is still present, although it cannot now be seen because the tabs you created are covering it. To re-display it, invoke the control’s context menu and choose "Show shared controls". You will see the appearance of the tabs change to indicate that neither of them is selected, and the "[Shared controls page]" caption will re-appear.
-
Return to the toolbox and select the CheckBox control. Add it to the shared controls page, positioning it near the bottom.
-
Click on tab 1 in the tab header area. The button will re-appear, but you will still see the check box. Clicking tab 2 will show that the check box stays visible, no matter which tab is selected.
-
By now you have seen several ways to add controls to your tab at design-time. It is also easy to add controls at run-time, using only a little code.
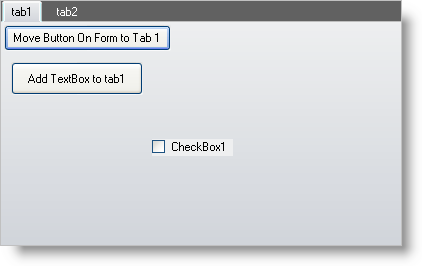
Return to the toolbox and select the Button control again, but this time place it directly on the form in the empty area beneath the Tab element.
-
Select tab 1 in the control, then double-click the Button1 control. Enter the following code in the button’s Click event:
Private Sub btnMoveButton_Click(ByVal sender As System.Object, _
  ByVal e As System.EventArgs) Handles btnMoveButton.Click
	Dim ctrlIndex As Integer
	' Add the control to the first tab
	Me.UltraTabPageControl1.Controls.Add(Me.btnAddTextBox)
	' Return the added controls index in the collection
	ctrlIndex = Me.UltraTabPageControl1.Controls.GetChildIndex( _
	  Me.btnAddTextBox)
	' Set the location of the newly added control
	Me.UltraTabPageControl1.Controls(ctrlIndex).Location = New Point(10, 40)
End Sub
private void btnMoveButton_Click(object sender, EventArgs e)
{
	// Add the control to the first tab
	this.ultraTabPageControl1.Controls.Add(this.btnAddTextBox);
	// Return the added controls index in the collection
	int ctrlIndex = this.ultraTabPageControl1.Controls.GetChildIndex(
	  this.btnAddTextBox);
	// Set the location of the newly added control
	this.ultraTabPageControl1.Controls[ctrlIndex].Location = new Point(10, 40);
}
-
Double-click on Button2 and enter the following code in that button’s Click event:
Private Sub btnAddTextBox_Click(ByVal sender As System.Object, _
  ByVal e As System.EventArgs) Handles btnAddTextBox.Click
	Dim TextBox2 As New TextBox()
	Dim ctrlIndex As Integer
	TextBox2.Text = "TextBox2"
	Me.UltraTabPageControl1.Controls.Add(TextBox2)
	ctrlIndex = Me.UltraTabPageControl1.Controls.GetChildIndex(TextBox2)
	Me.UltraTabPageControl1.Controls(ctrlIndex).Location = New Point(10, 80)
End Sub
private void btnAddTextBox_Click(object sender, EventArgs e)
{
	TextBox TextBox2 = new TextBox();
	TextBox2.Text = "TextBox2";
	this.ultraTabPageControl1.Controls.Add(TextBox2);
	int ctrlIndex = this.ultraTabPageControl1.Controls.GetChildIndex(TextBox2);
	this.ultraTabPageControl1.Controls[ctrlIndex].Location = new Point(10, 80);
}
-
Run the project and click on the button on Tab 1. You will see button on the form repositioned to the same tab as clicked button, in the position that was specified (relative to the container.) So you can use this method to take controls that already exist in the application and re-parent them to the tab of your choosing.
-
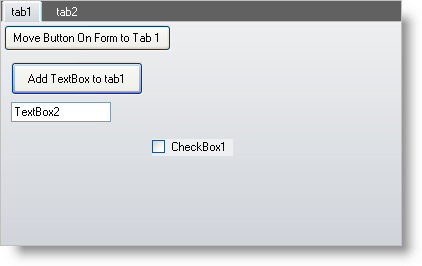
Click the moved button. You will see the text box defined in the code (TextBox2) appear on the same tab, directly under the moved button. You can use this method to dynamically create controls at run-time and place them on a tab as needed.
Stop the project when you are finished.