Version

Data Validation Interactions (XamSpreadsheet)

Purpose

This topic explains what actions can be performed by the user in relation with the data validation feature.

Required background

The following table lists the concept and topics required as a prerequisite to understanding this topic.

Type Content

Concept

Infragistics Excel Engine

Topic Purpose

In this section you will find information that will help you to better understand the object model and the functionalities of the Infragistics Excel Engine .

This topic explains in details the features of the XamSpreadsheet control from developer perspective.

This topic provides an overview of the visual elements of the XamSpreadsheet control.

This topic explains the supported user actions when navigating the control’s cells.

In this topic

This topic contains the following sections:

Introduction

Summary

The XamSpreadsheet control supports a data validation feature which allows you to set a validation rule on a cell which is used by the control to validate the user input. You can set only one rule per cell.

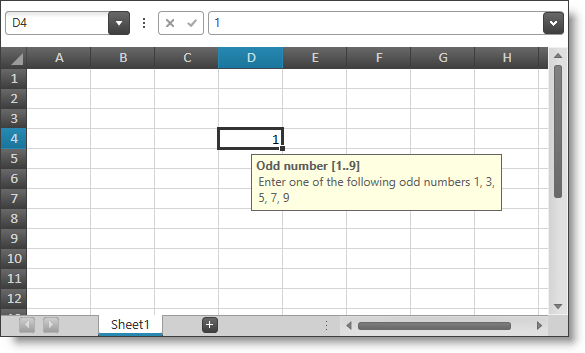
You can configure an input message to be shown when a cell with data validation rule is activated. This input message is shown in a floating box and has a description and an optional title. The input message has a default location center/bottom from the cell but will shift if there is not enough space. The input message can also be relocated by the user. Once dragged the input message will stay at that location for all cells in the same worksheet. You can also turn off showing the input message independently for each rule.

The following screenshot shows an input message under the current active cell:

xamSpreadsheet val2.png

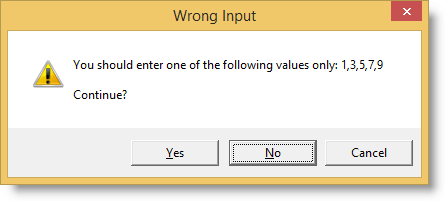
After the user confirms a new cell value, this triggers the data validation for the edited cell (if this cell has a data validation rule set). If the data validation does not pass the validation rule may be configured to show an error message. There are three types of error messages – information, warning and stop. They are distinguished by different icon and different set of buttons. The error message also has a description and an optional title.

The table below shows the different error messages types and their properties:

Error message type Buttons Icon

Information error message

OK, Cancel

xamSpreadsheet val4.png

Warning error message

Yes, No, Cancel

xamSpreadsheet val5.png

Stop error message

OK, Cancel

xamSpreadsheet val6.png

The following screenshot shows an error message of type warning:

xamSpreadsheet val3.png

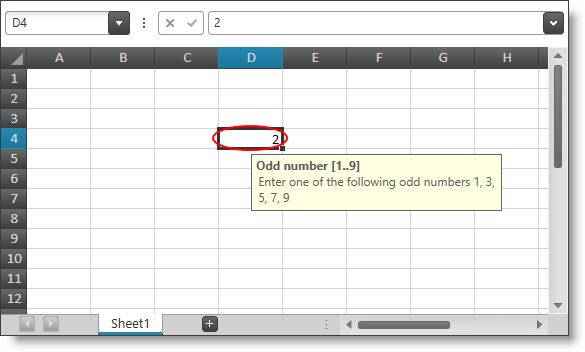
You can also execute commands to show or hide circles around cells whose values does not pass the validation.

The following screenshot shows an invalid value circle around one of the control’s cells:

xamSpreadsheet val1.png

User Interactions and Usability

User interactions summary chart

The following table summarizes the user interaction capabilities of the XamSpreadsheet control related to the data validation feature.

The user can… Using… Details

Relocate the input message

Mouse drag the input message

Relocate the input message box to a new convenient location.

Restore default positioning logic of the input message

Mouse double click on the input message

After double click the default positioned logic will be restored.

Trigger validation

  • Press Enter

  • Press Ctrl+Enter

  • Press Ctrl+Shift+Enter

  • Click on anywhere outside the currently edited cell

The respective cell must have been in editing mode prior confirming the new value which triggers the data validation.

Continue editing after unsuccessful data validation

  • Click on "No" button of a warning type error dialog.

  • Click on the "OK" button of a stop type error dialog.

The cell will stay in editing mode.

Revert to the previous value after an unsuccessful data validation

Click on the "Cancel" button of any type of error dialog.

The cell will exit editing mode and the old value will be restored.

Accept invalid value after unsuccessful data validation

  • Click on the "OK" button of an information type error dialog.

  • Click on the "Yes" button of a warning type error dialog.

The cell will exit editing mode and the new invalid value will be set.

Related Content

The following topics provide additional information related to this topic.

Topic Purpose

This topic explains how to configure and set the build-in data validation rules.

This topic explains how to handle the data validation event and how to show circles around the cells with invalid data.