

We recommend that you use the xamEditor controls instead of the xamInput controls. The xamInput controls are being planned for retirement over the next few years and will not receive any new features. We will continue to provide support and critical bug fixes for the xamInput controls during this time. For help or questions on migrating your codebase to the xamEditor controls, please contact support.
This topic explains how you can take advantage of the editing capabilities of the various xamInput™ controls when editing the values of xamGrid™ cells.
This document contains the following sections:
Required background
Introduction
Overview
Steps
You need to first read the following topics:
An important feature of the xamInput controls is their ability to be used in combination with the xamGrid control. This feature allows users to take advantage of the input controls’ full potential while modifying a cell’s value and at the same time allows you to check if the entered data meets adheres to predefined criteria.
This topic describes how to create an application where the xamGrid control to works together with the xamInput controls. The main focus is to give you an understanding of how to use the xamInputs with the grid’s template columns.
Following is a preview of the final result where the xamDateTimeInput control is used in the xamGrid to provide a date picker for the Date Ordered field.
Following is a conceptual overview of the process:
Create project
Create a WPF project. Next, add the following NuGet package references to your project:
Infragistics.WPF.Controls.Editors.XamDateTimeInput
Infragistics.WPF.Controls.Grids.XamGrid
For more information on setting up the NuGet feed and adding NuGet packages, you can take a look at the following documentation: NuGet Feeds.
Add data source.
Add the data source class
In the MainWindow.xaml.cs file add the class definition from Listing 1.
Add the XML contents file
Download the ProductDeliveryTask.xml file and copy it to the directory of your WPF project.
In the Solution Explorer of Visual Studio right-click your project and select Add>Existing Item.
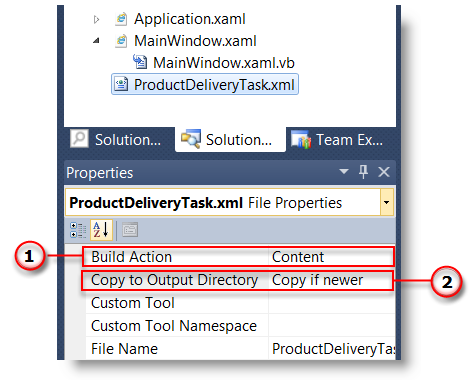
In the window locate the ProductDeliveryTask.xml file and press Add. This file contains sample data for the xamGrid.
Open its properties and set its Build Action to Content (1).
Set the Copy to OutputDirectory property to Copy if newer (2).
Add XAML Infragistics namespace
Open MainWindow.xaml and add the following namespace to the Window tag:
In XAML:
xmlns:ig="http://schemas.infragistics.com/xaml"
xmlns:editors="http://schemas.infragistics.com/xaml"
Add an instance of the xamGrid control
Inside the main layout Grid control insert a xamGrid and give it a value for x:Name for later reference. Your grid declaration should now look like this:
In XAML:
<ig:XamGrid x:Name="myGrid"> <ig:XamGrid/>Enable editing
By default the xamGrid’s contents cannot be edited. To change this
Declare tags for the EditingSettings property of the xamGrid
Add an EditingSettings object inside the tags.
Set the AllowEditing property of the EditingSettings object to a value other than None.
Create Template columns
Next, you create template columns according to the data source that you specified
Declare tags for the Columns property of the xamGrid
Add the TemplateColumn for the Product name to the columns collection.
TemplateColumns expose the ItemTemplate and EditorTemplate properties that enable you to specify how/what cell contents are displayed and edited by setting them to an instance of a data template. The data context of the item and editor templates is the data object that the current row represents.
Set the Key property.
The Key of a TemplateColumn has to match the name of a public property of the datasource objects. In the case with the ProductDeliveryTask objects the Key of the first template column would be “Name”. Optionally you can set the HeaderText property of the TemplateColumn as well. If you omit it, the Key is used as header of the column.
Set the TemplateColumn.ItemTemplate
The data template set as item template of the column is used to display the data. One approach you can choose is to use a xamInput control inside the item template and the other is to use a xamInput control in the EditorTemplate. In the example below the second approach is shown. Therefore for displaying the data you can use a text box whose Text property is bound to the Name property of the data context object.
Set the TemplateColumn.EditorTemplate
This is the most important step of the configuration process. To use a xamInput control for editing a cell value you need to add it in the data template that is set as editor template of the corresponding column. The xamInput control that you would use depends on the type of data that will be edited. The most suitable xamInput control for the Product column is the xamMaskedInput, because the product name is a text property. After adding a xamMaskedInput in the editor template of the column you need to bind its value property to the corresponding property of the data source object, in this case – Name. This ensures that when users edit the contents of a cell in this column, they will use the xamMaskedEditor. Additionally you can configure the xamMaskedInput control to suit your needs accordingly e.g. normally you would at least set the mask property.
This is the Product column declaration:
In XAML:
<ig:TemplateColumn HeaderText="Product" Key="Name">
    <ig:TemplateColumn.ItemTemplate>
        <DataTemplate>
            <TextBlock Text="{Binding Name}" />
        </DataTemplate>
    </ig:TemplateColumn.ItemTemplate>
    <ig:TemplateColumn.EditorTemplate>
        <DataTemplate>
            <editors:XamMaskedInput
                Value="{Binding Name, Mode=TwoWay}"
                Mask="CCCCCCCCCCCCCCCCCCCCCC" />
        </DataTemplate>
    </ig:TemplateColumn.EditorTemplate>
</ig:TemplateColumn>
Add the remaining TemplateColumns.
Using the process described in the previous step add template columns for the PriorityLevel, Package, Price and DateOrdered properties of the ProductDeliveryTask objects. For the complete XAML code refer to Listing 2.
Set the xamGrid’s ItemsSource
Next, set ProductDeliveryTask objects and set them as the xamGrid’s ItemsSource. Listing 3 demonstrates how to populate the grid with data from the ProductDeliveryTask.xml file using LINQ to XML.
Build and run your project
The following table lists the code examples provided below.
Listing 1: Data source class definition
In VB:
Public Class ProductDeliveryTask
        Public Property Name() As String
                Get
                        Return m_Name
                End Get
                Set(value As String)
                        m_Name = Value
                End Set
        End Property
        Private m_Name As String
        Public Property PriorityLevel() As Integer
                Get
                        Return m_PriorityLevel
                End Get
                Set(value As Integer)
                        m_PriorityLevel = Value
                End Set
        End Property
        Private m_PriorityLevel As Integer
        Public Property Package() As String
                Get
                        Return m_Package
                End Get
                Set(value As String)
                        m_Package = Value
                End Set
        End Property
        Private m_Package As String
        Public Property Price() As Decimal
                Get
                        Return m_Price
                End Get
                Set(value As Decimal)
                        m_Price = Value
                End Set
        End Property
        Private m_Price As Decimal
        Public Property DateOrdered() As System.Nullable(Of DateTime)
                Get
                        Return m_DateOrdered
                End Get
                Set(value As System.Nullable(Of DateTime))
                        m_DateOrdered = Value
                End Set
        End Property
        Private m_DateOrdered As System.Nullable(Of DateTime)
        Public Property IsActive() As Boolean
                Get
                        Return m_IsActive
                End Get
                Set(value As Boolean)
                        m_IsActive = Value
                End Set
        End Property
        Private m_IsActive As Boolean
End Class
In C#:
public class ProductDeliveryTask
{
    public string Name { get; set; }
    public int PriorityLevel { get; set; }
    public string Package { get; set; }
    public decimal Price { get; set; }
    public DateTime? DateOrdered { get; set; }
    public bool IsActive { get; set; }
}
Listing 2: Create template columns
In XAML:
<ig:XamGrid ItemsSource="{Binding}">
    <ig:XamGrid.EditingSettings>
        <ig:EditingSettings AllowEditing="Hover"/>
    </ig:XamGrid.EditingSettings>
    <ig:XamGrid.Columns>
        <ig:TemplateColumn HeaderText="Product" Key="Name">
            <ig:TemplateColumn.ItemTemplate>
                <DataTemplate>
                    <TextBlock Text="{Binding Name}"/>
                </DataTemplate>
            </ig:TemplateColumn.ItemTemplate>
            <ig:TemplateColumn.EditorTemplate>
                <DataTemplate>
                    <editors:XamMaskedInput
                        Mask="CCCCCCCCCCCCCCCCCCCCCC"
                        Value="{Binding Name, Mode=TwoWay}" />
                  </DataTemplate>
              </ig:TemplateColumn.EditorTemplate>
          </ig:TemplateColumn>
          <ig:TemplateColumn HeaderText="Packaging" Key="Package" >
              <ig:TemplateColumn.ItemTemplate>
                  <DataTemplate>
                      <TextBlock Text="{Binding Package}"/>
                  </DataTemplate>
              </ig:TemplateColumn.ItemTemplate>
              <ig:TemplateColumn.EditorTemplate>
                  <DataTemplate>
                      <editors:XamMaskedInput
                          Mask="CCCCCC"
                          Value="{Binding Package, Mode=TwoWay}" />
                  </DataTemplate>
              </ig:TemplateColumn.EditorTemplate>
          </ig:TemplateColumn>
          <ig:TemplateColumn HeaderText="Price" Key="Price">
              <ig:TemplateColumn.ItemTemplate>
                  <DataTemplate>
                       <TextBlock Text="{Binding Price}"/>
                   </DataTemplate>
               </ig:TemplateColumn.ItemTemplate>
               <ig:TemplateColumn.EditorTemplate>
                  <DataTemplate>
                      <editors:XamCurrencyInput
                          Mask="{}{currency:3.2}"
                          Value="{Binding Price, Mode=TwoWay}" />
                  </DataTemplate>
               </ig:TemplateColumn.EditorTemplate>
          </ig:TemplateColumn>
          <ig:TemplateColumn HeaderText="Priority" Key="ProrityLevel" >
              <ig:TemplateColumn.ItemTemplate>
                  <DataTemplate>
                      <TextBlock Text="{Binding PriorityLevel}"/>
                  </DataTemplate>
              </ig:TemplateColumn.ItemTemplate>
              <ig:TemplateColumn.EditorTemplate>
                  <DataTemplate>
                      <editors:XamNumericInput
                          Mask="{}{number:0-4}"
                          Value="{Binding PriorityLevel, Mode=TwoWay}" />
                  </DataTemplate>
              </ig:TemplateColumn.EditorTemplate>
          </ig:TemplateColumn>
          <ig:TemplateColumn HeaderText="DateOrdered" Key="DateOrdered">
              <ig:TemplateColumn.ItemTemplate>
                  <DataTemplate>
                      <TextBlock Text="{Binding DateOrdered}"/>
                  </DataTemplate>
              </ig:TemplateColumn.ItemTemplate>
              <ig:TemplateColumn.EditorTemplate>
                  <DataTemplate>
                      <editors:XamDateTimeInput
                          DropDownButtonDisplayMode="Always"
                          Value="{Binding DateOrdered, Mode=TwoWay}" />
                  </DataTemplate>
              </ig:TemplateColumn.EditorTemplate>
          </ig:TemplateColumn>
      </ig:XamGrid.Columns>
</ig:XamGrid>
Listing 3: Setting the xamGrid control’s ItemSource
In Visual Basic:
Imports System.Linq
Imports System.Xml.Linq
...
Public Sub MainWindow_Loaded(sender As Object, e As RoutedEventArgs)
        Dim doc As XDocument = XDocument.Load("ProductDeliveryTask.xml")
        Dim datasource = (From d In doc.Descendants("ProductDeliveryTask")
                          Select New ProductDeliveryTask() With { _
      .Name = d.Element("Name").Value, _
      .Package = d.Element("Package").Value, _
      .PriorityLevel = Integer.Parse(d.Element("PriorityLevel").Value), _
      .Price = Decimal.Parse(d.Element("Price").Value), _
      .DateOrdered = DateTime.Parse(d.Element("DateOrdered").Value), _
      .IsActive = Boolean.Parse(d.Element("IsActive").Value) _
       })
        Me.myGrid.ItemsSource = datasource.ToList()
End Sub
In C#:
using System;
using System.Linq;
using System.Xml.Linq;
...
void MainWindow_Loaded(object sender, RoutedEventArgs e)
{
    XDocument doc = XDocument.Load("ProductDeliveryTask.xml");
    var datasource = (from d in doc.Descendants("ProductDeliveryTask")
                      select new ProductDeliveryTask
                      {
                        Name = d.Element("Name").Value,
                        Package = d.Element("Package").Value,
                        PriorityLevel = int.Parse(d.Element("PriorityLevel").Value),
                        Price = decimal.Parse(d.Element("Price").Value),
                        DateOrdered = DateTime.Parse(d.Element("DateOrdered").Value),
                        IsActive = bool.Parse(d.Element("IsActive").Value)
                      });
    this.myGrid.ItemsSource = datasource.ToList();
}Following are some other topics you may find useful.