
This topic provides detailed instructions to help you get up and running as soon as possible with the xamRadialMenu ™.
The following topics are prerequisites to understanding this topic:
This topic contains the following sections:
The procedure bellow provides guidance on how to add the xamRadialMenu control and optional step on how to add different types of menu items.
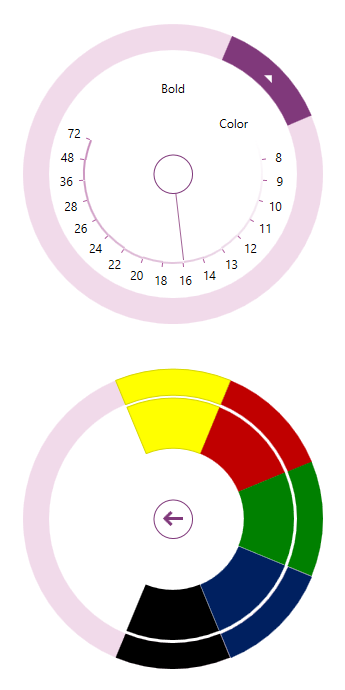
The following screenshot is a preview of the final result including all optional steps:
The following steps demonstrate how to add xamRadialMenu to your page.
Add the following NuGet package reference to your project:
Infragistics.WPF.RadialMenu
For more information on setting up the NuGet feed and adding NuGet packages, you can take a look at the following documentation: NuGet Feeds.
Add the following namespaces:
Following is the code that implements this example.
In XAML:
xmlns:ig="http://schemas.infragistics.com/xaml"Following is the code that implements this example.
In C#:
using Infragistics.Controls.Menus;Following is the code that implements this example.
In Visual Basic:
Imports Infragistics.Controls.MenusCreate and place the xamRadialMenu on your page:
Following is the code that implements this example.
In XAML:
<ig:XamRadialMenu
 x:Name="rMenu" Width="300" Height="300">
<!-- Put menu items here -->
</ig:XamRadialMenu>Define a button item in the xamRadialMenu :
Following is the code that implements this example.
In XAML:
<ig:RadialMenuItem
 Header="Bold"
 Click="RadialMenuBold_Click" />
Following is the code that implements this example.
In C#:
public void RadialMenuBold_Click(object sender, EventArgs e)
{
    // code for handling the button item click event
}
Following is the code that implements this example.
In Visual Basic:
Public Sub RadialMenuBold_Click(sender As Object, e As EventArgs)
    ' code for handling the button item click event
End SubDefine a color item with child color well items in the xamRadialMenu :
In XAML:
<ig:RadialMenuColorItem Header="Color">
    <ig:RadialMenuColorWell Color="#FFFF00" />
    <ig:RadialMenuColorWell Color="#C00000" />
    <ig:RadialMenuColorWell Color="#008000" />
    <ig:RadialMenuColorWell Color="#002060" />
    <ig:RadialMenuColorWell Color="#000000" />
</ig:RadialMenuColorItem>Following is the code that implements this example.
In XAML:
<ig:RadialMenuNumericGauge
 WedgeSpan="5" Value="16"
Ticks="8 9 10 11 12 13 14 16 18 20 22 24 26 28 36 48 72" />The following topic provides additional information related to this topic.