
This topic provides detailed instructions to help you get up and running as soon as possible with the control.
The following topics are prerequisites to understanding this topic:
This topic contains the following sections:
This procedure will guide you on adding the control to your page and show some hierarchically organized data. You will also learn how to configure some basic features of the control.
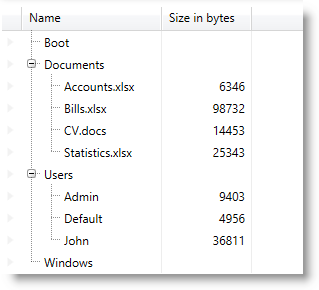
The following screenshot is a preview of the result:
To complete the procedure, you need to:
have a basic understanding of the Data Presenter family controls
have a basic understanding of how field layout is defined
Following is a conceptual overview of the process:
1. Define an entity type
2. Define a simple data source
3. Add the control to your page
4. Configure the control and create a field layout
The following steps demonstrate how to add the xamTreeGrid to your page.
Define a simple entity type with a Name and Size properties and a SubNodes list of the same type:
In C#:
public class FileNode
{
    public FileNode()
    {
        this.SubNodes = new List<FileNode>();
    }
    public string Name { get; set; }
    public int? Size { get; set; }
    public List<FileNode> SubNodes { get; set; }
}
In Visual Basic:
Public Class FileNode
 Public Sub New()
  Me.SubNodes = New List(Of FileNode)()
 End Sub
 Public Property Name() As String
  Get
   Return m_Name
  End Get
  Set
   m_Name = Value
  End Set
 End Property
 Private m_Name As String
 Public Property Size() As System.Nullable(Of Integer)
  Get
   Return m_Size
  End Get
  Set
   m_Size = Value
  End Set
 End Property
 Private m_Size As System.Nullable(Of Integer)
 Public Property SubNodes() As List(Of FileNode)
  Get
   Return m_SubNodes
  End Get
  Set
   m_SubNodes = Value
  End Set
 End Property
 Private m_SubNodes As List(Of FileNode)
End ClassCreate a data source class providing a hierarchical structure based on the type defined in the previous step with some data:
In C#:
namespace Sample.DataSource
{
    public class SimpleDataSource
    {
        private List<FileNode> fileNodes;
        public List<FileNode> FileNodes
        {
            get
            {
                if (fileNodes == null) fileNodes = GetDataSource();
                return fileNodes;
            }
        }
        private List<FileNode> GetDataSource()
        {
            List<FileNode> list = new List<FileNode>();
            list.Add(new FileNode() { Name = "Boot", Size = null });
            FileNode docs = new FileNode() { Name = "Documents", Size = null };
            docs.SubNodes.Add(new FileNode() { Name = "Accounts.xlsx", Size = 6346 });
            docs.SubNodes.Add(new FileNode() { Name = "Bills.xlsx", Size = 98732 });
            docs.SubNodes.Add(new FileNode() { Name = "CV.docs", Size = 14453 });
            docs.SubNodes.Add(new FileNode() { Name = "Statistics.xlsx", Size = 25343 });
            list.Add(docs);
            FileNode users = new FileNode() { Name = "Users", Size = null };
            users.SubNodes.Add(new FileNode() { Name = "Admin", Size = 9403 });
            users.SubNodes.Add(new FileNode() { Name = "Default", Size = 4956 });
            users.SubNodes.Add(new FileNode() { Name = "John", Size = 36811 });
            list.Add(users);
            list.Add(new FileNode() { Name = "Windows", Size = null });
            return list;
        }
    }
}
In Visual Basic:
Namespace Sample.DataSource
  Public Class SimpleDataSource
    Private m_fileNodes As List(Of FileNode)
    Public ReadOnly Property FileNodes() As List(Of FileNode)
        Get
            If m_fileNodes Is Nothing Then
                m_fileNodes = GetDataSource()
            End If
            Return m_fileNodes
        End Get
    End Property
    Private Function GetDataSource() As List(Of FileNode)
        Dim list As New List(Of FileNode)()
        list.Add(New FileNode() With { _
            .Name = "Boot", _
            .Size = Nothing _
        })
        Dim docs As New FileNode() With { _
            .Name = "Documents", _
            .Size = Nothing _
        }
        docs.SubNodes.Add(New FileNode() With { _
            .Name = "Accounts.xlsx", _
            .Size = 6346 _
        })
        docs.SubNodes.Add(New FileNode() With { _
            .Name = "Bills.xlsx", _
            .Size = 98732 _
        })
        docs.SubNodes.Add(New FileNode() With { _
            .Name = "CV.docs", _
            .Size = 14453 _
        })
        docs.SubNodes.Add(New FileNode() With { _
            .Name = "Statistics.xlsx", _
            .Size = 25343 _
        })
        list.Add(docs)
        Dim users As New FileNode() With { _
            .Name = "Users", _
            .Size = Nothing _
        }
        users.SubNodes.Add(New FileNode() With { _
            .Name = "Admin", _
            .Size = 9403 _
        })
        users.SubNodes.Add(New FileNode() With { _
            .Name = "Default", _
            .Size = 4956 _
        })
        users.SubNodes.Add(New FileNode() With { _
            .Name = "John", _
            .Size = 36811 _
        })
        list.Add(users)
        list.Add(New FileNode() With { _
            .Name = "Windows", _
            .Size = Nothing _
        })
        Return list
    End Function
 End Class
End NamespaceAdd the xamTreeGrid control to your page. Add an alias to the name space of the data source class and instantiate the data source class as a data context of the xamTreeGrid . Bind the xamTreeGrid’s DataSource property to the FileNodes property of the data context.
In XAML:
<Page
…
xmlns:igDP="http://infragistics.com/DataPresenter"
xmlns:data="clr-namespace:Sample.DataSource"
…
>
  <Grid x:Name="LayoutRoot">
    <igDP:XamTreeGrid x:Name="xtg"
      DataSource="{Binding Path=FileNodes}">
      <igDP:XamTreeGrid.DataContext>
        <data:SimpleDataSource />
      </igDP:XamTreeGrid.DataContext>
      <!--
      add field layout definitions here
      -->
    </igDP:XamTreeGrid>
  </Grid>
</Page>Disable the automatic field layout generation and configure the tree to be located in the Name field and also set 20 pixels for indenting each nested level. Provide a custom field layout with the following parameters:
Field 1 – Bound to the Name property of the entity object.
Field 2 – Bound to the Size property of the entity object.
Field 3 – Bound to the SubNodes collection of the entity object. Because this is a collection the control will obtain the child records from it.
In XAML:
<igDP:XamTreeGrid.FieldLayoutSettings>
    <igDP:FieldLayoutSettings AutoGenerateFields="False"/>
</igDP:XamTreeGrid.FieldLayoutSettings>
<igDP:XamTreeGrid.ViewSettings>
    <igDP:TreeViewSettings TreeFieldName="Name" IndentPerLevel="20" />
</igDP:XamTreeGrid.ViewSettings>
<igDP:XamTreeGrid.FieldLayouts>
    <igDP:FieldLayout>
        <igDP:TextField Name="Name" Label="Name" Width="150" />
        <igDP:NumericField Name="Size" Label="Size" Width="70" />
        <igDP:Field Name="SubNodes" />
    </igDP:FieldLayout>
</igDP:XamTreeGrid.FieldLayouts>The following topics provide additional information related to this topic.