Angular Essentials
Getting Started with Angular Essentials Tutorial
Angular is a widely used web application platform and framework created and maintained by Google. It serves as a total rewrite to AngularJS and the "Angular" name is meant to include all versions of the framework starting from 2 and up.
TypeScript is the core of Angular, being the language upon which Angular is written. As such, Angular implements major and core functionalities like TypeScript libraries while building client applications with additional HTML.
For a variety of reasons, Angular has grown in popularity among developers. It is easy to maintain with its component and class-based system, modular building, hierarchical structure, and simple, declarative templates. Furthermore, its cross-platform capabilities are advantageous to enterprise and SMB developers, including its speed with server-side rendering.
This Quick Angular Essentials Guide will go over the essential pieces of Angular and the main concepts behind working with the ever-growing platform for web-based applications.
What Is the Difference Between Angular and AngularJS
In the past, you might have worked with or at least heard about Angular and AngularJS. But there are a few main differences between Angular vs AngularJS that you must know about:
- Modularity - More of Angular core functionalities have moved to modules.
- Hierarchy - Angular has an architecture built around a hierarchy of components.
- Syntax - Angular has a different expression syntax for event and property binding.
- Dynamic loading - Angular will load libraries into memory at run-time, retrieve and execute functions, and then unload the library from memory.
- Iterative callbacks - Using RxJS, Angular makes it easier to compose asynchronous or callback-based code.
- Asynchronous template compilation - Angular, without controllers and the concept of "scope," makes it easier to pause template rendering and compile templates to generate the defined code.
Angular Ivy
Ivy is a rewrite of Angular rendering engine. With Ivy, components can be compiled independently of each other. This improves development time since the application will only recompile the components that changed. If you are a library or application author, please check https://docs.angular.lat/guide/ivy for more details and recommendations on achieving compatibility between an old/new Angular engine.
Tree Shaking
Ivy is designed to use tree-shaking which improves the management of Angular components. It ensures that unused code is not included in a bundle during the build process which results in smaller size of the application. Smaller bundles mean faster startup time. Code splitting optimizes the bundles even more.
Locality
Now each component can compile independently with its own local information that rebuilds significantly faster because it is not compiling the entire Angular app, but only those things which were changed.
Lazy Loading
With Ivy, we could lazy load components without requiring AngularNgModule. Also, the packages that are used by a lazy loaded component are bundled into lazy-loaded chunks.
Globalization
Locales don't need to be registered at compile time. Instead, they can be dynamically loaded at runtime and support multiple languages with a single application bundle. Which means if you want to change language, you don't need to restart the application.
Debugging
Ivy provides new features to Debug mode and makes improvements in the stack trace, which brings much more information about where an error comes from.
Faster testing
With the new implementation of TestBed in Ivy, it avoids recompilation between tests unless a component has been manually overridden. This leads to 40 -50% boost in test speed.
Basic Angular Architecture
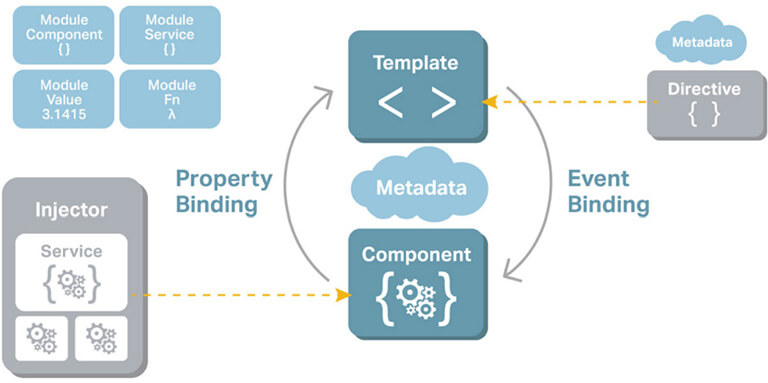
Here's a brief overview of the architecture involved and the building blocks that will be covered in this Guide:
- NgModules - Declares a compilation context for a set of components that is dedicated to an application domain, a workflow, or a related set of capabilities.
- Components - Defines a class that contains application data and logic and works with an HTML template that defines a view.
- Template - Combines HTML with Angular markup that can modify HTML elements before they're displayed.
- Directive - Attaches custom behavior to elements in the DOM.
- Two-way data binding - Coordinates the parts of a template with the parts of a component.
- Services - Typically, a class used to increase modularity and reusability with a narrow and well-defined purpose.
- Dependency injection - Provides components with needed services and gives access to a service class.
- Routing - Makes it easy to implement navigation within the application.
This diagram best represents the relationship between the building blocks:
Setting up Angular Development Environment
In order to set up the environment, you must start by downloading Angular with the Angular CLI tool. If you have a machine that doesn't have Node.js and npm installed, make sure to download and install them here. Then, you'll run a global install of the Angular CLI:
npm install --g @angular/cli
NgModule In Angular
We’ve come to the following question “What is NgModule in Angular”? Basically, NgModule in Angular is a class that is marked by the @NgModule decorator. NgModules are excellent for organizing related items and they function to configure both the injector and compiler.
This decorator has the information on how to compile a component's template and how to create an injector at runtime, all within a metadata object. As you can guess, @NgModule serves to identify and bridge the gap between its own directives, components, pipes, and external components that rely on these pieces.
This decorator had the information on how to compile a component's template and how to create an injector at runtime, all within a metadata object. As you could guess, @NgModule serves to identify and bridge the gap between its own directives, components,and pipes, and external components that rely on these pieces.
The exports property also makes some of the module's make-up public, ensuring that the external components can effectively use them.
As a last bit, @NgModule also adds services providers to the application dependency injectors, foundationally making the application more adaptable.
Angular Directives - Types & Examples
Directives create DOM elements and change their structure or behavior in an Angular application. There are three types of directives in Angular:
- Components - Directives with templates.
- Attribute directives - Change appearance and behavior of an element, component, or other directive.
- Structural directives - Change DOM layout by adding or removing elements.
Components
In Angular applications, what you see in the browser (or elsewhere) is a component. A component consists of the following parts:
- A TypeScript class called the Component class
- An HTML file called the template of the component
- An optional CSS file for the styling of the component.
- A class to hold data and the logic.
- HTML template and styles to display data in the app. It is also called a view and is seen by the user on the screen to interact.
- Metadata that defines the behavior of a component. Component metadata is applied to the class using the @Component decorator. Different behavior of the component can be passed as properties of the object, which is an input parameter of the @Component decorator.
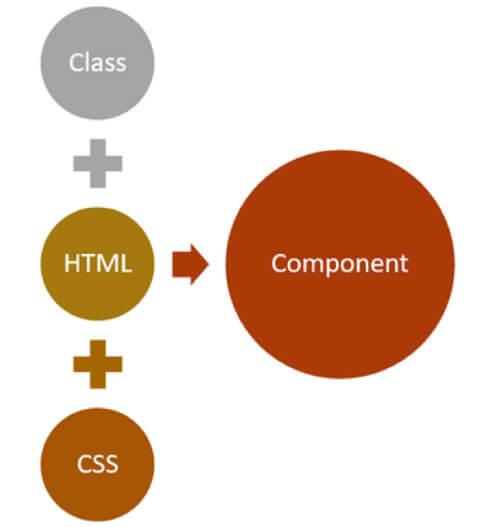
A component is a type of directive with its own template. Whatever you see in an Angular application is a component.
Component Metadata
The @Component decorator decorates a class as a component. It is a function that takes an object as a parameter. In the @Component decorator, we can set the values of different properties to set the behavior of the component. The most used properties are as follows:
- template
- templateUrl
- Providers
- styles
- styleUrls
- selector
- encapsulation
- changeDetection
- animations
- viewProviders
Apart from the above-mentioned ones, there are also a few other important properties. Let's look into them one by one.
Angular Change Detection
To quickly answer the question “what is change detection in Angular”, let’s say that it is the process through which Angular verifies if your app state is modified and whether any DOM needs to be further updated. This property determines how the change detector will work for the component. We set the ChangeDetectionStrategy of the component in the property. There are two possible values:
- Default
- OnPush
We will cover this property in detail in further sections.
Encapsulation
This property determines whether Angular will create a shadow DOM for a component. It determines the ViewEncapsulation mode of the component. There are four possible values:
- Emulated (this is the default)
- Native
- None
- ShadowDom
Using a Component
A component can be used inside an Angular application in various ways:
- As a root component.
- As a child component. We can use a component inside another Component.
- Navigate to a component using routing. In this case, the component will be loaded in RouterOutlet.
- Dynamically loading component using ComponentFactoryResolver.
The component must be part of a module. To use a component in a module, first import it and then pass it to declaration array of the module.
@NgModule({
declarations: [
AppComponent,
ProductComponent
]
})
Standalone Components
With the release of Angular 14, we can build standalone components and they don’t need to be declared in an NgModule. They manage their own dependencies and they can directly import another standalone component.
You can create a standalone component with:
ng g c {componentName} --standalone
If you want to use other components, directives, or pipes in a standalone template, by setting the “standalone” flag you can import what is needed directly into the standalone component itself.
import { Component, OnInit } from '@angular/core';
import { CommonModule } from '@angular/common';
@Component({
selector: 'app-card', standalone: true, imports: [CommonModule], templateUrl: './card.component.html', styleUrls: ['./card.component.css'] })
export class CardComponent implements OnInit {
constructor() {} ngOnInit(): void {} }
Standalone components can take full advantage of the Angular ecosystem.
Angular has provided us with many inbuilt structural and attribute directives. Inbuilt structural directives are *ngFor and *ngIf. Attribute directives are NgStyle and NgModel.
Using Angular Structural Directives
*ngIf is a structure directive used to provide an "if" condition to the statements to get executed. If the expression evaluates to a False value, the elements are removed from the DOM. If it evaluates to True, the element is added to the DOM. Consider the below listing. In this, the *ngIf directive will add div in DOM if the value of showMessage property is True.
@Component({
Selector: ‘app-message’, Template: ` < div *ngIf=”showMessage” >Show Message </div> ` })
export class AppMessageComponent { showMessage = true; }
Keep in mind that *ngIf does not hide or show a DOM element. Rather, it adds or removes depending on the condition. The *ngFor structure directive creates DOM elements in a loop. Consider the below listing. In this, the *ngFor directive will add rows in a table the number of items in the data array.
@Component({
Selector: ‘app-message’, Template: ` <table> <tr *ngFor=’let f of data’> <td>{{f.name}}</td> </tr> </table> ` })
export class AppMessageComponent { data = [ {name : 'foo'}, {name: 'koo'} ]; }
In most cases, you won't have to create custom structural directives; built-in directives should be enough.
Angular Image Directive
The image directive was released for developer preview in version 14.2 of Angular and it is part of a stable version from 15.0. NgOptimizedImage directive optimizes images loading which can improve the LCP significantly. It prioritizes loading of critical images, lazy loads non-priority images by default and automatically sets the fetchpriority attribute on the tag. In addition, it has build-in warning to ensure the code is following best practices. Its available properties are:
- ngSrc - contains name of the image which will be processed by the loader and applied to src property.
- ngSrcset - containsa list of width and density descriptors
- Width - the width of the image in pixels
- Height - the height of the image in pixels
- Loading - defines the type it can be one of the lazy, eager or auto
- Priority - indicates whether the image should be loaded with high priority
NgOptimizedImage is a standalone directive and can be imported directly into the component or into the necesssary ngModule.
import { NgOptimizedImage } from '@angular/common';
// Example with a non-standalone component
@NgModule({
imports: [NgOptimizedImage], })
class AppModule {}
// Example with standalone component
@Component({
standalone: true imports: [NgOptimizedImage], })
class StandaloneComponent {}
What Is Data Binding in Angular
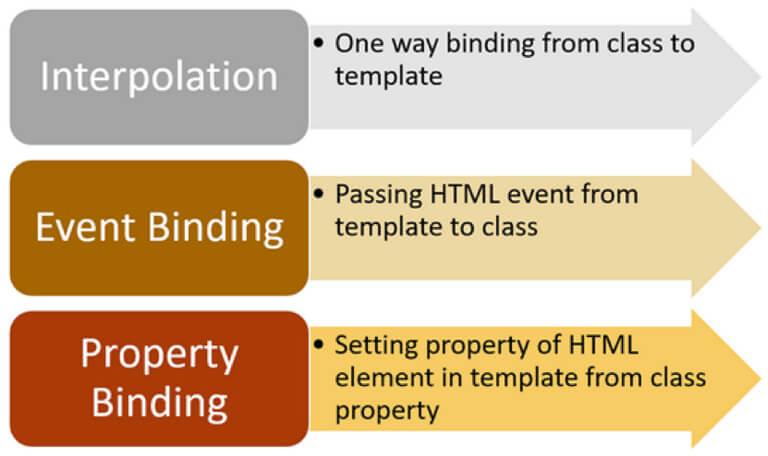
Data binding determines how data flows between the component class and a component template. This is used as a technique that links data to the view layer. Data binding in Angular is easy and unlike in WPF, you don't have to worry about data context, view model, or INotifyPropertyChanged (INPC). The only thing you need is an HTML file and a typescript file.
Angular provides us with three types of data bindings:
- Interpolation
- Property binding
- Event binding
What Is Interpolation in Angular
Angular interpolation is one-way data binding. It is used to pass data from the component class to the template. The syntax of interpolation is {{propertyname}}.
Let's say that we have component class as shown below:
export class AppComponent { product = { title: 'Cricket Bat', price: 500 }; }
We must pass the product from the component class to the template. Keep in mind that to keep the example simple, we're hardcoding the value of the product object. However, in a real scenario, data could be fetched from the database using the API. We can display the value of the product object using interpolation, as shown in the listing below:
<h1>Product</h1>
<h2>Title: {{product.title}}</h2>
<h2>Price: {{product.price}}</h2>
Using interpolation, data is passed from the component class to the template. Ideally, whenever the value of the product object is changed, the template will be updated with the updated value of the product object.
In Angular, there is something called change detector service. It makes sure that the value of the property in the component class and the template are synced with each other.
Therefore, if you want to display data in Angular, you must use interpolation data binding.
Property Binding
Angular provides you with another type of binding, called property binding. The syntax of a property binding is the square bracket: []. It allows for setting the property of HTML elements on a template with the property from the component class.
So, let's say that you have a component class like the one below:
export class AppComponent {
btnHeight = 100; btnWidth = 100; }
Now, you can set the height and width properties of a button on a template with the properties of the component class using property binding.
<button [style.height.px] = 'btnHeight' [style.width.px] = 'btnWidth' >Add Product</button>
Angular property binding is used to set the property of HTML elements with the properties of the component class. You can also set properties of other HTML elements like image, list, table, etc. Whenever the property value in the component class changes, the HTML element property will be updated in the property binding.
Event Binding
Angular provides you with a third type of binding to capture events raised on templates in a component class. For instance, there's a button on the component template that allows you to call a function in the component class. You can do this using event binding. The syntax behind event binding is (eventname).
For this event binding in Angular example, you might have a component class like this:
export class AppComponent {
addProduct() { console.log('add product'); } }
You want to call the addProduct function on the click of a button on the template. You can do this using event binding:
<h1>Product</h1>
<Button (click)=’addProduct()’>Add Product</button>
Angular offers you these three bindings. In event binding, data flows from template to class and in property binding and interpolation, data flows from class to template.
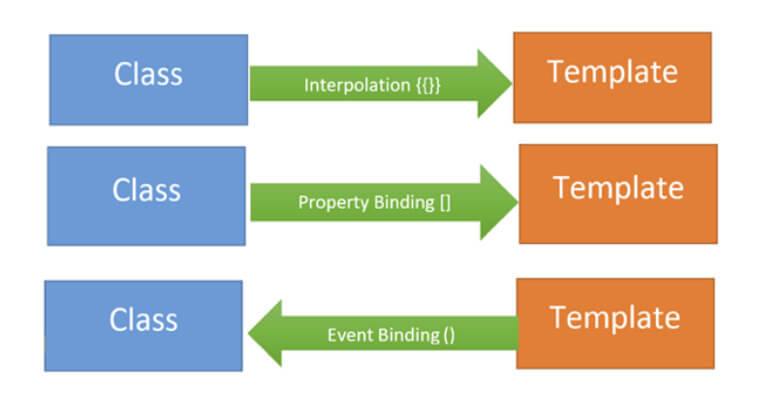
Angular does not have a built-in two-way data binding. However, by combining property binding and event binding, you can achieve two-way data binding.
Angular provides us with a directive, ngModel, to achieve two-way data binding, and it's very easy to use. First, import FormsModule, and then you can create two-way data binding:
export class AppComponent {
name = 'foo'; }
We can do a two-way data-bind the name property with an input box:
<input type="text" [(ngModel)]='name' /> <h2>{{name}}</h2>
As you see, we are using [(ngModel)] to create two-way data binding between input control and name property. Whenever a user changes the value of the input box, the name property will be updated and vice versa.
Pipes
Pipes are functions which are used in templates to transform data. Angular provides us with a set of built-in pipes which can be used in any template.
DatePipe formats date to a string:
<p>StartDate: {{value | date: ‘dd/MM/yyyy’}}</p>
PercentagePipe converts value to percentage:
value = 0.2;
…
<p>Percentage: {{value | percent}}</p> // 20%
Lowercase & Uppercase transform casing of a string:
<p>Lowercase text: {{value | lowercase}}</p>
<p>Uppercase text: {{value | uppercase}}</p>
Creating a Custom Pipe
We might need a specific transformation that is not built-in, then we can create a custom one. We must create a class which implements the PipeTransform class, and our logic must be placed in the transform method.
import { Pipe, PipeTransform } from ‘@angular/core’;
@Pipe({
name: ‘capitalize’ })
export class CapitalizePipe implements PipeTransform {
public transform(text: string): string { return text[0].toUpperCase() + text.slice(1); } }
Then to use it, we must register it in our module declarations.
Component Communication
In Angular, components communicate with each other to share data such as object, string, number, array, or HTML.
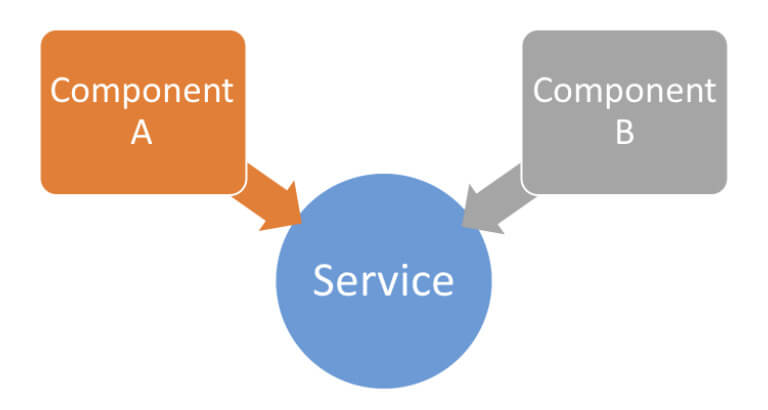
To understand component communication, first, we must understand the relationship between components. For example, when two components are not related to each other, they communicate through an Angular service.
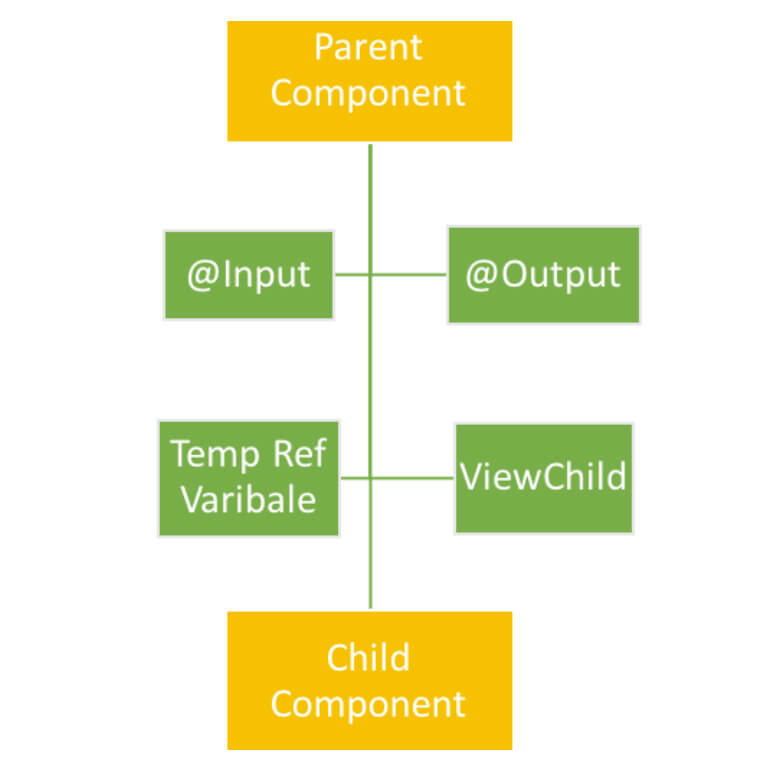
When you use a component inside another component, you create a component hierarchy. The Angular component being used inside another component is known as the child component and the enclosing component is known as the parent component. As shown in the image below, in context of AppComponent, app-child is a child component and AppComponent is a parent component.
import { Component } from '@angular/core';
@Component({
selector: 'app-root', template: ` <h1>Hello {{message}}</h1> <app-child></app-child> //child component ` }) export class AppComponent { //parent component message = 'I am Parent'; }
Parent and child components can communicate with each other in the following ways:
- @Input()
- @Output()
- Temp Ref Variable
- ViewChild
- ContentChild
When components are not related to each other, they communicate using services. Otherwise, they communicate using one of the various options depending on the communication criteria. Let's explore all the options one by one.
@INPUT
You can pass data from a parent component to a child component using the @Input decorator. Data could be of any form such as the primitive type's string, number, object, array, etc.

To understand the use of @Input, let’s create a component:
import { Component } from '@angular/core';
@Component({
selector: 'app-child', template: `<h2> Hi {{greetMessage}}</h2>` })
export class AppChildComponent {
greetMessage = ‘I am Child’; }
AppComponent is using AppChildComponent, so AppComponent is the parent component and AppChildComponent is the child component. To pass data, the @Input decorator uses the child component properties. To do this, we will need to modify the child AppChildComponent as shown in the listing below:
import { Component, Input, OnInit } from '@angular/core';
@Component({
selector: 'app-child', template: `<h2> Hi {{greetMessage}}</h2>` })
export class AppChildComponent implements OnInit {
@Input() greetMessage: string; constructor() { } ngOnInit() { } }
As you notice, we have modified the greetMessage property with the @Input() decorator. So essentially, in the child component, we have decorated the greetMessage property with the @Input() decorator so that value of the greetMessage property can be set from the parent component. Next, let's modify the parent component AppComponent to pass data to the child component.
import { Component } from '@angular/core';
@Component({
selector: 'app-root', template: ` <h2>Hello {{message}}</h2>` })
export class AppComponent {
message = 'I am Parent'; childmessage = 'I am passed from Parent to child component'; }
From the parent component, we are setting the value of the child component's property greetMessage. To pass a value to the child component, we must pass the child component property inside a square bracket and set its value to any property of the parent component. We are passing the value of the childmessage property from the parent component to the greetMessage property of the child component.
@OUTPUT
You can emit the event from the child component to the parent component using the @Output decorator.

Temp Ref Variable
See how we can use Event binding to achieve two-way binding in Angular. We use @Output to emit an event to another component. Let's modify AppChildComponent as shown in the listing below:
import { Component, Input, EventEmitter, Output } from '@ angular/core';
@Component({
selector: 'app-child', template: `<button (click)=”handleClick()”>Click me</button> ` })
export class AppChildComponent {
handleClick() { console.log(‘hey I am clicked in child’); } }
There is a button in the AppChildComponent template calling the function handleClick. Let's use the app-child component inside the AppComponent as shown in the listing below:
import { Component, OnInit } from '@angular/core';
@Component({
selector: 'app-root', template: `` })
export class AppComponent implements OnInit { ngOnInit() { } }
Here, we're using AppChildComponent inside AppComponent. Thereby, creating a parent/child kind of relationship in which AppComponent is the parent and AppChildComponent is the child. When we run the application, we'll see this message in the browser console:
So far, it's quite simple to use event binding to get the button to call the function in the component. Now, let's tweak the requirement a bit. What if you want to execute a function of AppComponent on the click event of a button inside AppChildComponent?
To do this, you must emit the button-click event from AppChildComponent. Import EventEmitter and output from @angular/core.
Here, we are going to emit an event and pass a parameter to the event. Modify AppChildComponent as shown in next code listing:
import { Component, EventEmitter, Output } from '@angular core';
@Component({
selector: 'app-child', template: `<button (click)=”valueChanged()”>Click me</button>` })
export class AppChildComponent {
@Output() valueChange = new EventEmitter(); counter = 0; valueChanged() { this.counter = this.counter + 1; this.valueChange.emit(this.counter); } }
We performed the following tasks in the AppChildComponent class:
- Created a variable called counter that will be passed as the parameter of the emitted event.
- Created an EventEmitter valueChange that will be emitted to the parent component.
- Created a function named valueChanged(). This function is called on the click event of the button, and inside the function, the event valueChange is emitted.
- While emitting the valueChange event, the value of the counter is passed as a parameter. In the parent component AppComponent, the child component AppChildComponent can be used as shown in the listing below:
import { Component, OnInit } from '@angular/core';
@Component({
selector: 'app-root', template: ` <app-child (valueChange)='displayCounter($event)'> ` })
export class AppComponent implements OnInit {
ngOnInit() { } displayCounter(count) { console.log(count); } }
Right now, we are performing the following tasks in the AppComponent class:
- Using <app-child> in the template.
- In the <app-child> element, using event binding to use the valueChange event.
- Calling the displayCounter function on the valueChange event.
- In the displayCounter function, printing the value of the counter passed from the AppChildComponent.
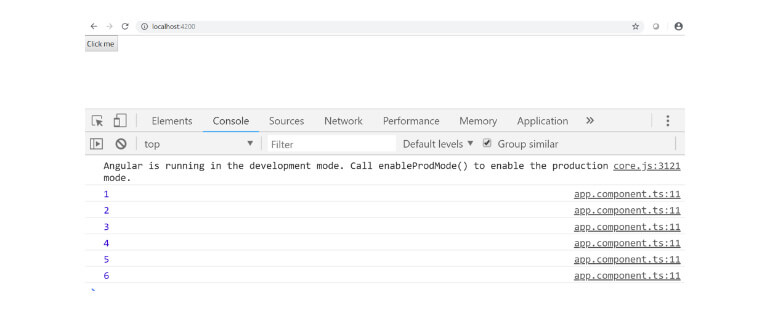
As you can see, the function of AppComponent is called upon the click event of the button placed on the AppChildComponent. This can be done with @Output and EventEmitter. When you run the application and click the button, you can see the value of the counter in the browser console. Each time you click on the button, the counter value is increased by 1.
Continue Reading
Fill out the form to continue reading.
