Guide: Building the Perfect Blazor Grid

Blazor Data Grid is essential for building interactive, high-performing, and visually appealing web applications. While there are various powerful functionalities that the Grid packs, it is of a great importance to know when and how to use them in order to craft better UX.
With this Blazor Data Grid Whitepaper, we aim to help you understand not just the fundamentals but some very practical insights and best practices like passing and using Variables, enabling key Grid features, plus additional tips and tricks for you when using Infragistics Blazor Grid.
In this whitepaper we will cover the following topics
- Intro about Infragistics Blazor Grid
- What are the advantages of using Infragistics Blazor Grid
- How to use it in a Blazor Application
- Passing and using Variables in a Grid
- Tips and tricks while using Infragistics Blazor Grid
- Key features and steps to be perfect on Infragistics Blazor Grid
Infragistics Blazor Grid
A Grid control is a graphical user interface element used in software development to display and manipulate tabular data. It is commonly used in applications that need to present data in a structured format, such as tabular or spreadsheets.
Infragistics Blazor Grid Controls is a specific implementation of a Grid control designed to be used with Blazor - a framework for building interactive web applications using C# and .NET.
The Blazor Grid Control by Infragistics is a powerful user interface component that allows developers to display, edit, and manage tabular data in Blazor applications. It provides a range of features and functionalities to make working with data in web applications more efficient and user-friendly.
Here are some of the key features and functionalities that Infragistics Blazor Grid Controls typically offer:
- Data Binding
The Grid Control allows you to easily bind it to various data sources, including collections, databases, and web services. This means you can display and work with data from a wide range of back-end systems.
- Sorting and Grouping
Users can sort data by clicking on column headers and you can also group data based on specific columns to create a hierarchical view.
- Filtering
Users can apply filters to display specific subsets of data, making it easier to find and analyze information.
- Editing
The Grid Control supports inline editing, allowing users to modify data directly within the Grid. This is especially useful for applications that require data manipulation.
- Selection and Multi-Selection
Users can select single or multiple rows within the Grid, which can be used for various purposes like deletion, copying, or performing operations on the selected data.
- Paging
If dealing with a large dataset, the Grid Control can implement pagination to display a limited set of data at a time, with options to navigate between pages.
- Events and Event Handling
The control generates events based on user interactions (like clicking on a cell or row), allowing developers to respond to these events with custom logic.
- Templates
Developers can create custom templates to control the appearance and layout of the Grid.
- Exporting Data
Users can export data from the Grid to various formats like Excel, PDF, or CSV for further analysis or reporting.
- Styling and Theming
Developers can customize the appearance of the Grid, including things like color schemes, fonts, and layout.
- Accessibility and Localization
This control is designed with accessibility in mind, making it usable by people with disabilities. It also supports localization for multi-language applications.
Advantages of Using Infragistics Blazor Grid
Here are some potential advantages of using Infragistics Blazor Grid:
- Seamless Integration with Blazor
Since Infragistics Blazor Grid is designed specifically for Blazor, it integrates seamlessly with Blazor applications. This means you can leverage the full power of Blazor's component model, two-way data binding, and other features without any compatibility issues. - Rich Set of Features
Infragistics Blazor Grid Controls offer a comprehensive set of features for working with tabular data. This includes sorting, filtering, grouping, editing, selection, exporting, and more. This can save developers significant time and effort in implementing these functionalities from scratch. - Performance Optimization
Infragistics often emphasizes performance in their controls. The Blazor Grid Control is fully optimized for efficient rendering and data manipulation, which can be crucial for applications dealing with large datasets. - Advanced Customization and Theming
Infragistics controls typically provide a high level of customization, allowing developers to tailor the appearance and behavior of the Grid to fit specific design requirements. This can be particularly important for creating a consistent and visually appealing user interface. - Excellent Documentation and Support
Infragistics is known for providing comprehensive documentation, tutorials, and support resources. This can be invaluable for developers who are new to the control or need assistance in using its features effectively. - Accessibility and Localization Support
Infragistics often places a strong emphasis on accessibility and localization features in their controls. This ensures that the Grid is usable by people with disabilities and can be adapted for different languages and regions. - Integration with Other Infragistics Controls
If you have other Infragistics controls or components in your application, using the Infragistics Blazor Grid can lead to a more cohesive and consistent user experience, as the controls are designed to work together seamlessly. - Regular Updates and Maintenance
Infragistics typically releases updates and bug fixes for their controls, which can ensure that your application remains up-to-date and secure. - Community and Ecosystem
Infragistics has an active community or ecosystem surrounding Blazor controls, providing additional resources, forums, and third-party extensions that can be beneficial for developers.
Getting Started With Infragistics Blazor Grid
These are the steps to use in Infragistics Grid for any Blazor project:
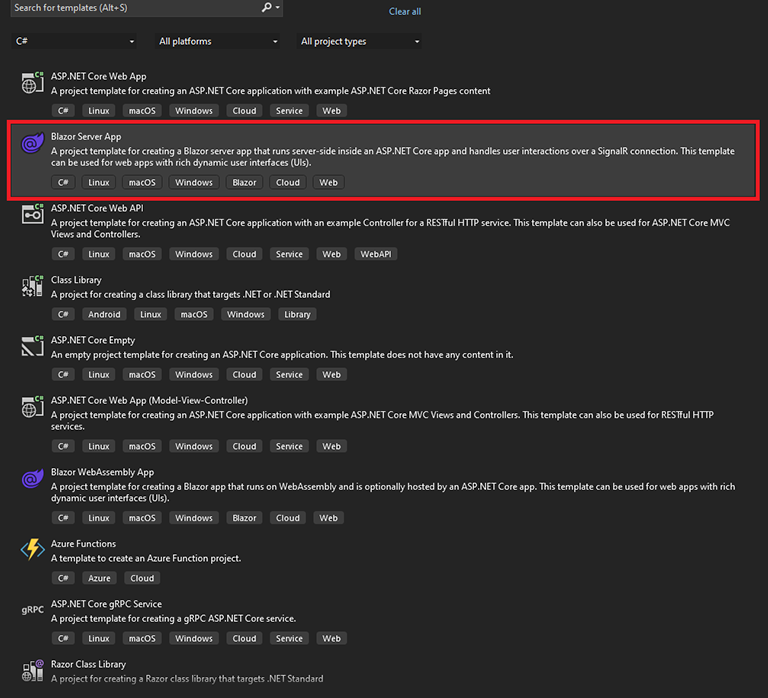
Step 1: Create a Blazor project
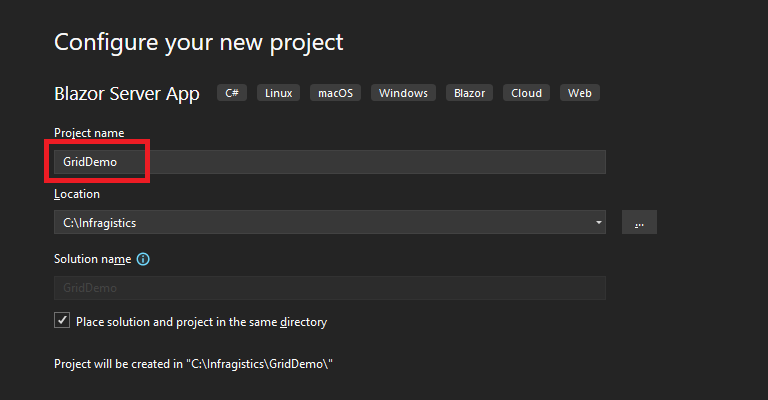
Step 2: Give the project a Name
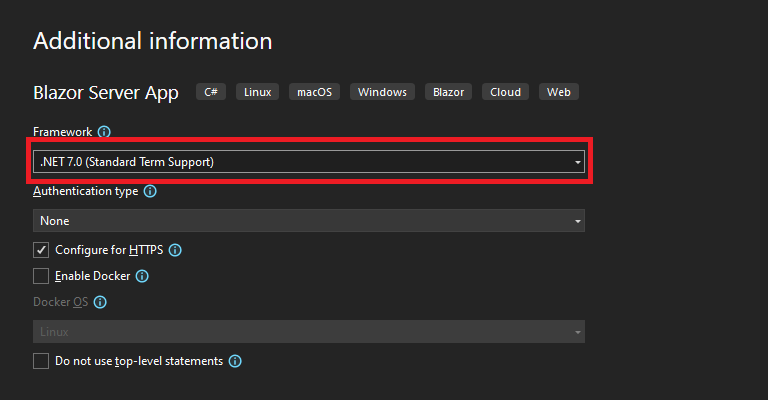
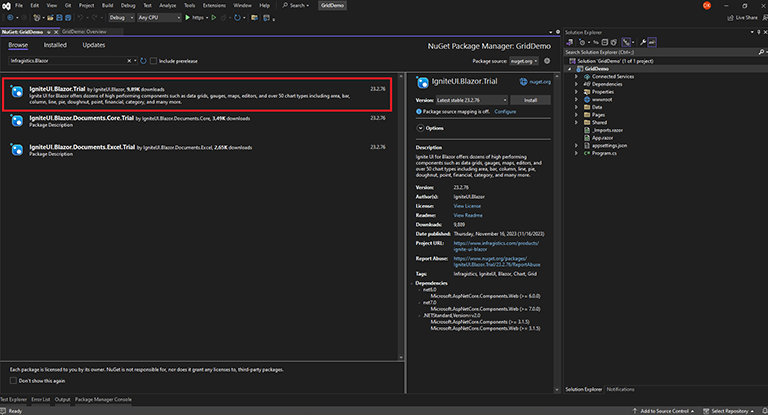
Step 3: Install the Infragistics Blazor package
Package Manager Console with the following command:
Install-Package IgniteUI.Blazor
Alternatively, you can use the NuGet Package Manager GUI to search for and install the package.
Note that you will have to add Infragistics Licenced Nuget Feed.
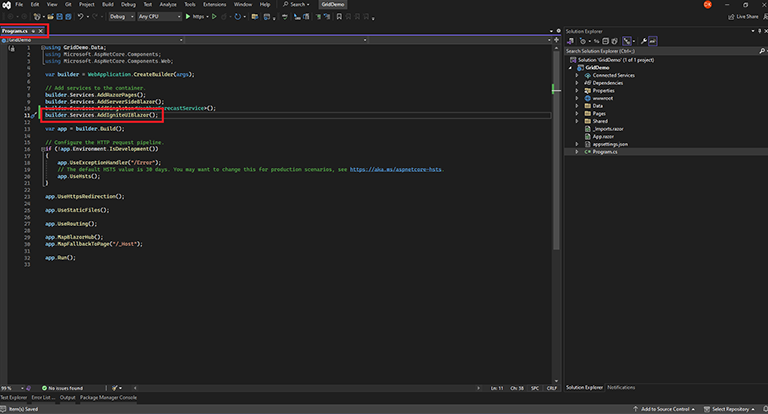
Step 4: Open the Program.cs file and register the Ignite UI for Blazor Service by calling builder.Services.AddIgniteUIBlazor function like in the image given below:
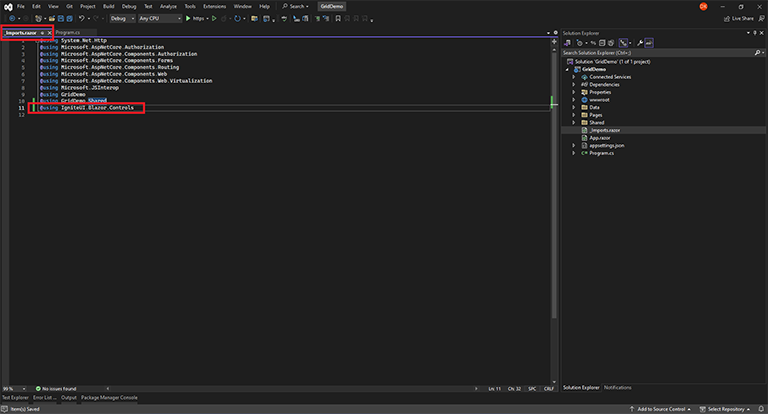
Step 5: Add the IgniteUI.Blazor.Controls namespace in the _Imports.razor file
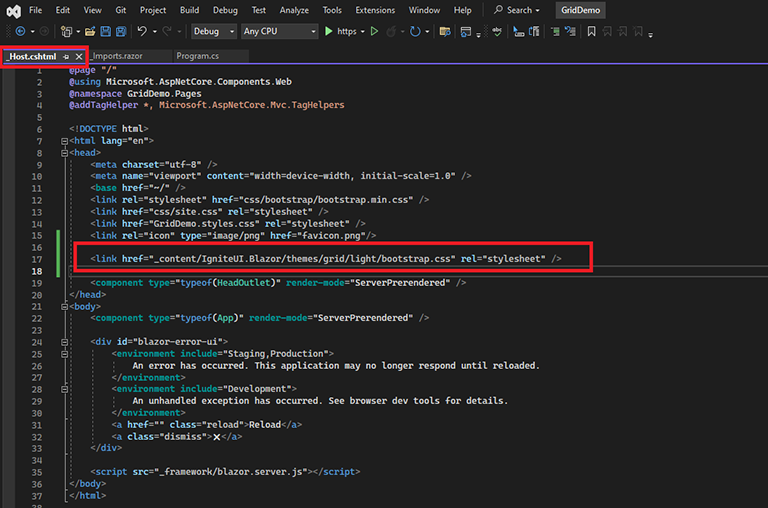
Step 6: Go to the _Host.cshtml page and register the bootstrap.css file
<link href="_content/IgniteUI.Blazor/themes/grid/light/bootstrap.css" rel="stylesheet" />
Step 7: Go to Index.razor page and write the code to load Grid
@page "/"
<PageTitle>Index</PageTitle>
<h3>Infragistics Blazor Grid</h3>
<br />
<div class="container vertical">
<div class="container vertical fill">
<IgbGrid Id="grid" AutoGenerate="false" Data="@dataSource">
<IgbColumn Width="50%" Field="Id" />
<IgbColumn Width="50%" Field="Name" />
</IgbGrid>
</div>
</div>
@code
{
List<Employee> dataSource = new List<Employee>
{
new Employee { Id = "1", Name = "James" },
new Employee { Id = "2", Name = "John" },
new Employee { Id = "3", Name = "Robert" },
};
public class Employee
{
public string Id { get; set; }
public string Name { get; set; }
}
}
Step 8: Run the application
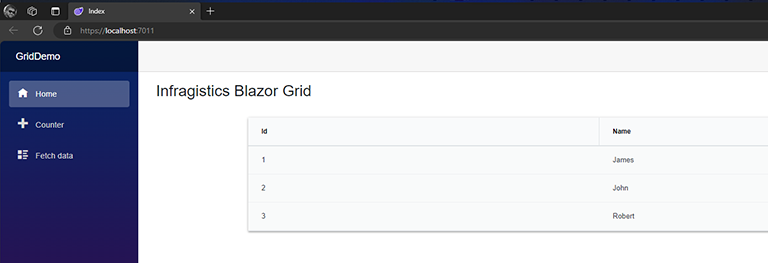
Tips and Tricks While Using Infragistics Blazor Grid
- Styling the Grid Header
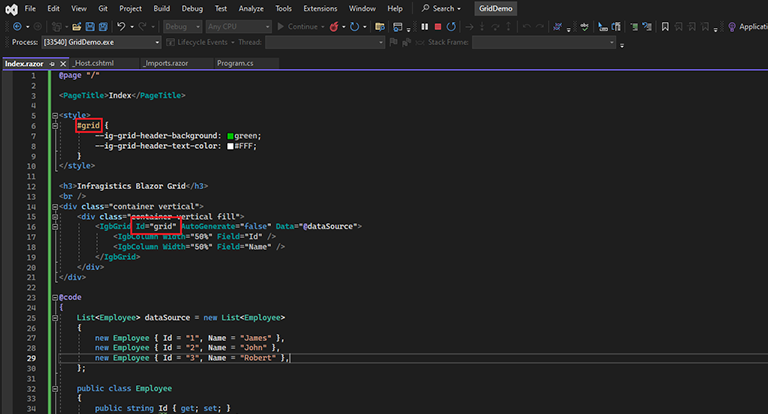
If we have to change color of Grid, we can apply CSS class like this:
<style>
#grid {
--ig-grid-header-background: green;
--ig-grid-header-text-color: #FFF;
}
</style>

- Data Binding
Ensure that you have a proper data source bound to the Grid using the Data property. This can be a list, array, or any IEnumerable collection. - Column Configuration
Use the IgbColumn component to define columns in your Grid. You can set properties like Field, Header, DataType, Filterable, etc. to customize the appearance and behavior of each column. - Paging and Sorting
Enable paging and sorting options to allow users to navigate through large datasets. You can use the Paging of the Grid.There will be default sort properties in the Grid like shown bellow:
<div class="container vertical">
<div class="container vertical fill">
<IgbGrid Id="grid" AutoGenerate="false" Data="@dataSource">
<IgbPaginator PerPage="5">
</IgbPaginator>
<IgbColumn Width="50%" Field="Id" />
<IgbColumn Width="50%" Field="Name" />
</IgbGrid>
</div>
</div>
- Filtering
Enable filtering to allow users to refine data based on specific criteria. Set AllowFiltering="true" to the Grid and then configure each column with the property Filterable. - Templates
Leverage templates for customizing the content of cells, headers, and footers. Use the CellTemplate, HeaderTemplate, and FooterTemplate properties. - Grouping
Enable grouping to organize data based on specific column values using Groupable property for the column. Also use the GroupingExpressions property and configure group settings. - Editing
If you need to allow users to edit data directly in the Grid, you can configure the editing with the RowEditable property of the IgbGrid and Editable property of the IgbColumn. - Performance Optimization
Consider server-side data operations for large datasets. Implement features like server-side paging and server-side filtering for better performance.
Key Features and Steps To Be Perfect on Infragistics Blazor Grid
To become proficient in using the Infragistics Blazor Grid, it's important to familiarize yourself with its key features and follow certain steps for effective implementation.
Key Features to Master This Component
-
Data Binding
Understand how to bind data to the Grid. This includes binding to lists, collections, and more complex data sources. -
Column Configuration
Learn how to define columns, set headers, data fields, and customize column behavior. -
Paging and Sorting
Implement paging and sorting options to handle large datasets effectively. -
Filtering
Enable users to filter data based on specific criteria. -
Templates
Utilize templates for customizing cell content, headers, footers, and more. -
Grouping
Organize data into groups based on specific column values. -
Editing
Implement editing capabilities, if required, for inline or form-based editing of grid data. -
Events Handling
Understand how to handle events like cell click, row select, sorting events, etc. -
Exporting Data
Implement functionality to export grid data to different formats like Excel, CSV, etc. -
Performance Optimization
Learn techniques to optimize performance, especially for large datasets. This may include virtualization and server-side operations. -
Accessibility
Ensure that your Grid is accessible to all users by providing appropriate ARIA attributes and ensuring keyboard navigation. -
Localization
Learn how to localize text and messages displayed in the Grid. -
Styling and Theming
Customize the appearance of the Grid to match your application's design.
Steps to Master Infragistics Blazor Grid
-
Read Documentation
Start by thoroughly reading the official documentation provided by Infragistics. This will give you a solid understanding of the component's capabilities and how to use them.
Blazor Grid Component (Data Table) - Infragistics -
Practice with Simple Examples
Begin by implementing basic functionality, such as data binding, column configuration, and paging, in a small project. This will help you get comfortable with the syntax and concepts.
IgniteUI/igniteui-blazor (github.com) -
Explore Advanced Features
Gradually move on to more advanced features like filtering, templates, grouping, and editing. Implement each feature one at a time and test thoroughly. -
Review Code Samples
Look for code samples and tutorials provided by Infragistics or the community. Analyze the code to understand best practices and different ways to implement specific features.
IgniteUI/igniteui-blazor (github.com) -
Build Real-world Projects
Apply your knowledge to real-world projects. This will help you understand how to integrate the Grid into larger applications and deal with complex scenarios. -
Stay Updated
Keep an eye on updates and new releases from Infragistics. Familiarize yourself with any new features or improvements introduced in the latest versions. -
Engage with the Community
Participate in forums, discussions, and communities related to Infragistics Blazor components. This is a great way to learn from others, ask questions, and share your experiences.
Ignite UI for Blazor | Infragistics Forums -
Experiment and Innovate
Don't be afraid to experiment and try out new approaches. This will help you discover creative solutions and improve your skills. -
Debugging and Troubleshooting
Practice debugging techniques for identifying and fixing issues that may arise while working with the Grid. -
Continuous Learning
Stay curious and keep learning about Blazor, web development best practices, and related technologies. This will help you become a well-rounded developer.
Source code for demo: dkamburov/BlazorGridDemo (github.com)
Continue Reading
Fill out the form to continue reading.

