License FAQ and Installation
Ignite UI for Angular is offered under a dual-license model, which allows for both commercial and permissive open-source use, depending on the components, modules, directives, and services being used.
It is crucial to understand which license applies to which part of the package. The topic Open Source vs Premium contains details on what type of license is applied to each component and therefore if you need to buy a commercial license based on the components you are using in your projects.
License Agreements
For components under commercial license, it is important to know all the legal terms and conditions that apply regarding their purchase and use.
Note
We have updated our license terms and subscription model in fourth quarter of 2025.
If your trial has ended or your subscription has expired, each developer on your team using components under commercial license from Ignite UI will need to purchase a subscription. This will enable you to use our private npm feed hosted on https://packages.infragistics.com/npm/js-licensed/ for development. There you will find the latest versions of the Ignite UI for Angular packages. If you have a current subscription, you can use this private feed and you will have access to the full version of Ignite UI for Angular.
Infragistics offers free, non-commercial, not-for-resale (NFR) licenses for the following:
- If you are part of a developer program like the Microsoft MVP, Microsoft Regional Director, Google Developer Expert, etc.
- If you are a primary, secondary or university student, or an academic institution, or a professor.
If you qualify for a free, non-commercial, NFR license or if you have any license questions, please contact us.
Ignite UI for Angular npm packages - Using the Private npm feed
Npm is the most popular package manager and is also the default one for the runtime environment Node.js. Highly adopted, it is one of the fastest and easiest ways to manage the packages that you depend on in your project. For more information on how npm works, read the official npm documentation.
Infragistics Ignite UI for Angular is available as an npm package and you can add it as a dependency to your project in a few easy steps using the Ignite UI CLI or using Ignite UI for Angular Schematics. Choosing this approach will not require configuring npm. If you plan to only use components from Ignite UI for Angular under MIT license, there is nothing else you will need to do. However, if you are using components under a commercial license, downloading the package from npm starts your trial period of the product.
Note
What does it mean to start using a trial version? It means that you will be using a version of our product with a Watermark part of your web view. It doesn’t mean that you will be using the licensed package for a certain amount of time before it expires. For example, for a month.
The Infragistics Ignite UI Dock Manager Web Component is available as a separate npm package and by installing it you will start using the Ignite UI Dock Manager Web Component Trial version of the product.
More information on how to start using the Ignite UI for Angular npm package can be found in this topic. Additional information on Ignite UI Dock Manager Web Component can be found in the Dock Manager documentation.
Upgrading packages using our Angular Schematics or Ignite UI CLI
If Ignite UI for Angular has been added to the project using ng add or the project has been created through our schematics collection or Ignite UI CLI, you can use our upgrade-packages to automatically upgrade your app to using our licensed packages. Your project package dependencies will include either @igniteui/angular-schematics or igniteui-cli, with both of them supporting the upgrade command.
Note
As the process changes the packages, we recommend that you update your project first before switching. This way you will avoid picking up a higher version of Ignite UI Angular and missing on potential update migrations. Follow our Update Guide.
Depending on your project setup, either run the following schematic in your project:
ng g @igniteui/angular-schematics:upgrade-packages
or use igniteui-cli:
ig upgrade-packages
The schematic or command will take care of switching the package dependencies of the project and update source references. You'll be asked to login to our npm registry if not already setup.
Note
If your project is using yarn, make sure to run upgrade-packages with the --skip-install flag. Then execute yarn install after to properly update your yarn.lock as the upgrade command currently uses npm for the install.
How to setup your environment to use the private npm feed (Step by step guide)
First you need to setup the private registry and to associate this registry with the Infragistics scope
This will allow you to seamlessly use a mix of packages from the public npm registry and the Infragistics private registry.
Note
If your account is not licensed (you are still using a Trial account) the private package feed won't be accessible to you e.g. it will return 404 or 403 error message. Only licensed accounts can access the packages.infragistics private feed.
Now, to log in to our private feed using npm
npm version 9+
Our private feed doesn't currently support login/adduser commands with npm v9, so we recommend the following steps instead to add the required auth fields to the config:
npm config set @infragistics:registry https://packages.infragistics.com/npm/js-licensed/
npm config set //packages.infragistics.com/npm/js-licensed/:username=YOUR_USERNAME
npm config set //packages.infragistics.com/npm/js-licensed/:email=YOUR_IG_EMAIL
npm config set //packages.infragistics.com/npm/js-licensed/:_auth=YOUR_IG_AUTH_TOKEN
You can generate Access Token through your Infragistics profile.
This approach is applicable to all prior versions of npm.
npm version up to v8
Run the adduser command and specify a user account and password:
npm adduser --registry=https://packages.infragistics.com/npm/js-licensed/ --scope=@infragistics
You will be asked to provide the username and the password that you use for logging into your Infragistics account. You should also provide the email that is registered to your Infragistics profile.
Note
npm is disallowing the use of the "@" symbol inside your username as it is considered as being "not safe for the net". Because your username is actually the email that you use for your Infragistics account it always contains the symbol "@". That's why you must escape this limitation by replacing the "@" symbol with "!!" (two exclamation marks). For example, if your username is "username@example.com" when asked about your username you should provide the following input: "username!!example.com".
Note
macOS shell behavior: If you're using macOS and setting the :_auth token manually via npm config set, make sure to wrap the token in double quotes like this:
npm config set //packages.infragistics.com/npm/js-licensed/:_auth="YOUR_IG_AUTH_TOKEN"
This is necessary due to shell parsing differences on macOS that may cause authentication issues if special characters in the token are not properly quoted. This issue doesn't typically occur on Windows.
After this is done, you will be logged in and you will be able to install the latest versions of the Ignite UI packages into your project
npm uninstall igniteui-angular
npm install @infragistics/igniteui-angular

npm uninstall igniteui-dockmanager
npm install @infragistics/igniteui-dockmanager
Keep in mind that we have set the Ignite UI for Angular package to be scoped, meaning that no registry changes are needed if you want to install packages from our private feed and from npmjs.org simultaneously.
Some additional changes might have to be made in your project source
If you are upgrading from a trial to a licensed package and you are not using the automated CLI migrations:
- Add a paths mapping in the project's tsconfig.json.
{
  /* ... */
  "compilerOptions": {
    "baseUrl": "./",
    "outDir": "./dist/out-tsc",
    /* ... */
    "paths": {
      "igniteui-dockmanager": ["./node_modules/@infragistics/igniteui-dockmanager"],
      "igniteui-dockmanager/*": ["./node_modules/@infragistics/igniteui-dockmanager/*"],
    }
  }
}
- Add a
stylePreprocessorOptionsmapping to your project'sangular.json
{
  "projects": {
    ..
    "prefix": "app",
      "architect": {
        "build": {
          "builder": "@angular-devkit/build-angular:browser",
          "options": {
            ...
            "aot": true,
            "stylePreprocessorOptions": {
                "includePaths": [
                    "node_modules/@infragistics"
                ]
            }
            ...
},
- Remove the
~sign from your project's Sass imports for theigniteui-angular/libsource:
@use "~igniteui-angular/lib/core/styles/themes/index" as *;

// Should be changed to
@use "igniteui-angular/lib/core/styles/themes/index" as *;
If you've already adopted npm and have an Ignite UI for Angular license, set up the Infragistics private feed to boost your productivity and use the full potential of Ignite UI for Angular.
Access Token Usage
You can also authenticate to our private npm feed using an access token, which you can acquire through your infragistics.com user account. The access token authentication is the preferred alternative when you want to integrate a CI process in a publicly accessible repository which uses the Ignite UI for Angular licensed packages.
The following information is on how to setup authentication to our private npm registry using an access token in local configuration, Azure Pipelines build procedures and Travis CI build process:
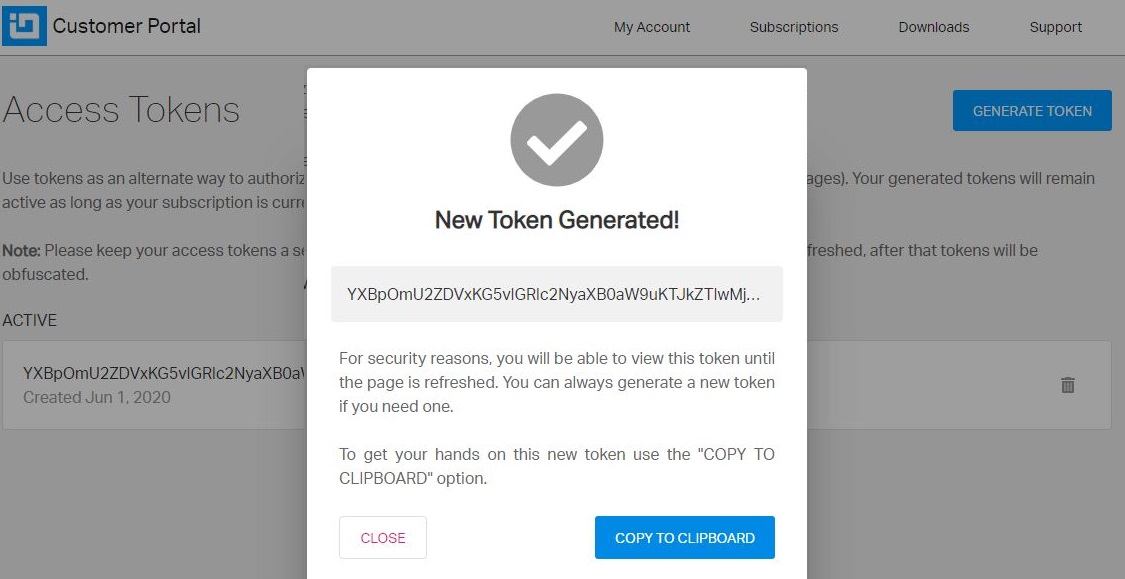
- Generate a token from https://account.infragistics.com/package-feeds

Note
Each token is Base64 encoded.
- Add the following into your .npmrc file
@infragistics:registry=https://packages.infragistics.com/npm/js-licensed/
//packages.infragistics.com/npm/js-licensed/:_auth=YOUR_ACCESS_TOKEN
//packages.infragistics.com/npm/js-licensed/:username=YOUR_USERNAME
Azure Pipelines Configuration
Update azure-pipelines.yml with the following steps:
steps:

- script: npm config set @infragistics:registry $(npmRegistry)
  displayName: 'Npm add registry'
- script: npm config set $(igScope):_auth=$(token)
  displayName: 'Npm config auth'
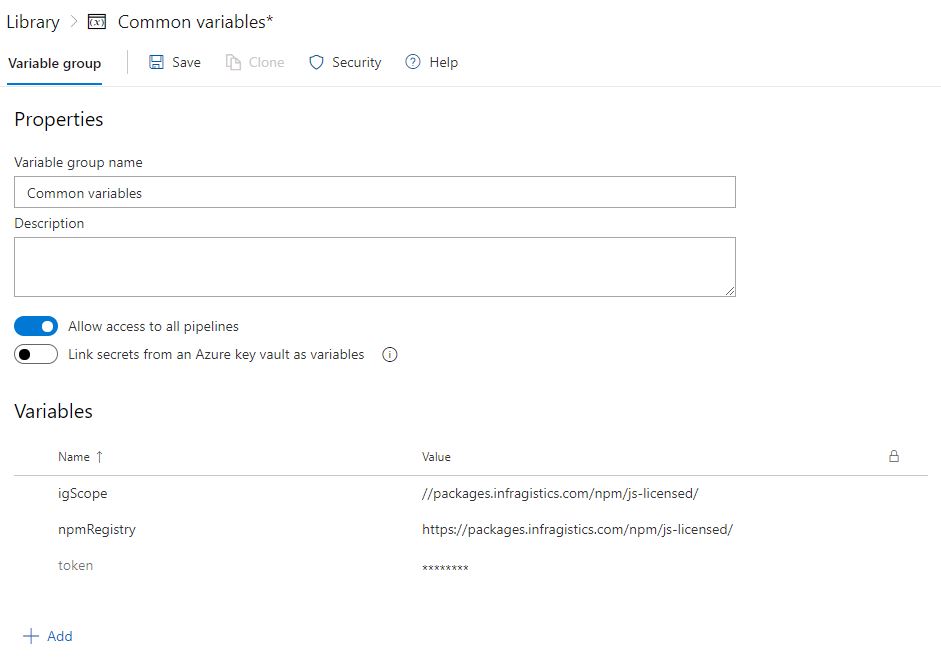
Now, add variables for the npm registry, scope, and token. There are two ways to do so:
Define Variable Group from the Library page under Pipelines
This article explains how to use a variable group to store values that you want to control and make available across multiple pipelines.

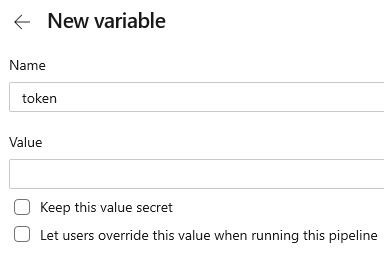
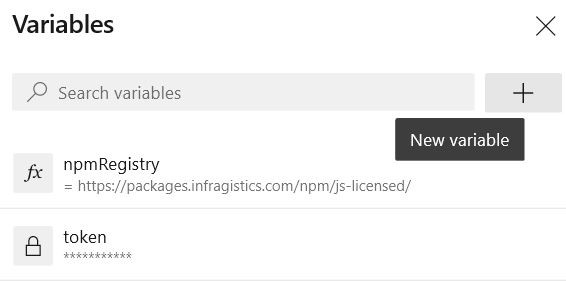
Define the variables in the Pipeline Settings UI and reference them in your YAML file
In the most common case, you set the variables and use them within the YAML file.


Travis CI Configuration
Follow a similar approach here. The only difference is that the configuration is set in the before_install step:
before_install:
- echo "@infragistics:registry=https://packages.infragistics.com/npm/js-licensed/" >> ~/.npmrc
- echo "//packages.infragistics.com/npm/js-licensed/:_auth=$TOKEN" >> ~/.npmrc
The best way to define an environment variable depends on what type of information it will contain. So you have two options:
- encrypt it and add it to your .travis.yml
- add it to your Repository Settings
GitHub Actions Configuration
Add the following scripts before the npm install (or npm ci) step in your CI workflow configuration:
- run: echo "@infragistics:registry=https://packages.infragistics.com/npm/js-licensed/" >> ~/.npmrc
- run: echo "//packages.infragistics.com/npm/js-licensed/:_auth=${{ secrets.NPM_TOKEN }}" >> ~/.npmrc
Define secrets (encrypted environment variables) and use them in the GitHub actions workflow for sensitive information like the access token.