License FAQ and Installation
License Agreements in Ignite UI for Web Components
It is important to know all the legal terms and conditions regarding the Ignite UI for Web Components that you purchase and use.
We have updated our license terms and subscription model in second quarter of 2020.
If your trial has ended or your subscription has expired, each developer on your team using Ignite UI will need to purchase a subscription. This will enable you to use our private npm feed hosted on https://packages.infragistics.com/npm/js-licensed/ for development. There you will find the latest versions of the Ignite UI for Web Components packages. If you have a current subscription, you can use this private feed and you will have access to the full version of Ignite UI for Web Components.
For detailed explanation of the Ignite UI license agreement and terms of use, click here.
Infragistics offers free, non-commercial, not-for-resale (NFR) licenses for the following:
- If you are part of a developer program like the Microsoft MVP, Microsoft Regional Director, Google Developer Expert, etc.
- If you are a primary, secondary or university student, or an academic institution, or a professor.
If you qualify for a free, non-commercial, NFR license or if you have any license questions, please contact us.
Currently only the igniteui-dockmanager package is available in our private npm feed, but in the future we will add the other Ignite UI for Web Components packages as well.
Ignite UI for Web Components npm packages - Using the Private npm feed
Npm is the most popular package manager and is also the default one for the runtime environment Node.js. It is highly adopted and is one of the fastest and easiest ways to manage the packages that you depend on in your project. For more information on how npm works, read the official npm documentation.
Infragistics Ignite UI for Web Components is available as npm packages and you can add them as dependencies to your project in a few easy steps. Choosing this approach will not require configuring npm. By installing this package you will start using the Ignite UI for Web Components Trial version of the product.
Currently only the igniteui-dockmanager npm package has a trial watermark, but in the future we will add it to the other Ignite UI for Web Components packages as well.
How to setup your environment to use the private npm feed
First you need to setup the private registry and to associate this registry with the Infragistics scope
This will allow you to seamlessly use a mix of packages from the public npm registry and the Infragistics private registry. You will be asked to provide the username and the password that you use for logging into your Infragistics account. You should also provide the email that is registered to your Infragistics profile.
If your account is not licensed (you are still using a Trial account) the private package feed won't be accessible to you e.g. it will return 404 or 403 error message. Only licensed accounts can access the packages.infragistics private feed.
Now, to log in to our private feed using npm
npm version 9+
Our private feed doesn't currently support login/adduser commands with npm v9, so we recommend the following steps instead to add the required auth fields to the config:
npm config set @infragistics:registry https://packages.infragistics.com/npm/js-licensed/

npm config set //packages.infragistics.com/npm/js-licensed/:username=YOUR_USERNAME

npm config set //packages.infragistics.com/npm/js-licensed/:email=YOUR_IG_EMAIL

npm config set //packages.infragistics.com/npm/js-licensed/:_auth=YOUR_IG_AUTH_TOKEN
You can generate Access Token through your Infragistics profile.
This approach is applicable to all prior versions of npm.
npm version up to v8
Run the adduser command and specify a user account and password:
npm adduser --registry=https://packages.infragistics.com/npm/js-licensed/ --scope=@infragistics
You will be asked to provide the username and the password that you use for logging into your Infragistics account. You should also provide the email that is registered to your Infragistics profile.
npmis disallowing the use of the"@"symbol inside your username as it is considered as being "not safe for the net". Because your username is actually the email that you use for your Infragistics account it always contains the symbol"@". That's why you must escape this limitation by replacing the"@"symbol with"!!"(two exclamation marks). For example, if your username is"username@example.com"when asked about your username you should provide the following input:"username!!example.com".
After this is done, you will be logged in and you will be able to install the latest versions of the Ignite UI packages into your project
npm uninstall igniteui-dockmanager
npm install @infragistics/igniteui-dockmanager

npm uninstall igniteui-dockmanager
npm install @infragistics/igniteui-dockmanager
Have in mind that we have set the Ignite UI for Web Components package to be scoped, meaning that no changing the registries is needed if you want to install packages from our private feed and from npmjs.org simultaneously.
Changes in your project source after license package update
If you are upgrading from trial to licensed package the new packages will be scoped under @infragistics.
As a result you can either:
Do a global replace for all trial packages and change then to the licensed scoped version across all files in your project. For example, replace all
igniteui-dockmanagerreferences to@infragistics/igniteui-dockmanagerThe change should affect all imports where such packages are used.Or
Add a paths mapping in the project tsconfig.json.
{
  /* ... */
  "compilerOptions": {
    "baseUrl": "./",
    "outDir": "./dist/out-tsc",
    /* ... */
    "paths": {
      "igniteui-dockmanager": ["./node_modules/@infragistics/igniteui-dockmanager"],
      "igniteui-dockmanager/*": ["./node_modules/@infragistics/igniteui-dockmanager/*"],
    }
  }
}
- Change the themes imports like this:
@import '~igniteui-dockmanager/dist/collection/styles/igc.themes';

// Should be changed to

@import '~@infragistics/igniteui-dockmanager/dist/collection/styles/igc.themes';
So, if you've already adopted npm and you have an Ignite UI for Web Components license, don't hesitate setting up the Infragistics private feed and boost your productivity, using the full potential of Ignite UI for Web Components.
Access Token Usage
You can also authenticate to our private npm feed using an access token, which you can acquire through your infragistics.com user account. The access token authentication is the preferred alternative when you want to integrate a CI process in a publicly accessible repository, which uses the Ignite UI for Web Components licensed packages.
The following information is on how to setup authentication to our private npm registry using an access token in local configuration, Azure Pipelines build procedures and Travis CI build process:
- Generate a token from https://account.infragistics.com/access-tokens
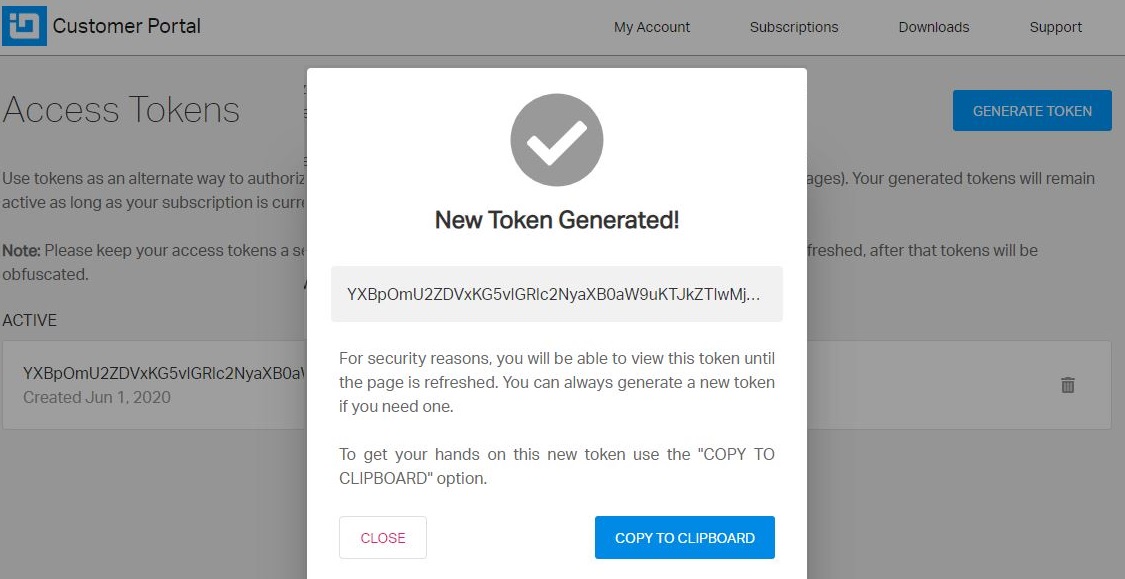
Each token is with Base64 encoding.
- Add the following into your .npmrc file
@infragistics:registry=https://packages.infragistics.com/npm/js-licensed/
//packages.infragistics.com/npm/js-licensed/:_auth=YOUR_ACCESS_TOKEN
//packages.infragistics.com/npm/js-licensed/:username=YOUR_USERNAME
Azure Pipelines Configuration
Update the azure-pipelines.yml with the following steps:
steps:

- script: npm config set @infragistics:registry $(npmRegistry)
  displayName: 'Npm add registry'
- script: npm config set $(igScope):_auth=$(token)
  displayName: 'Npm config auth'
Add npm registry and token variables.
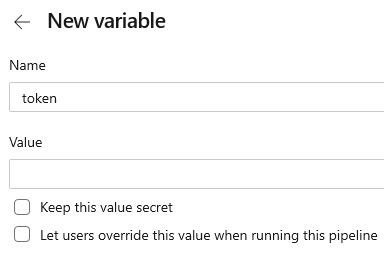
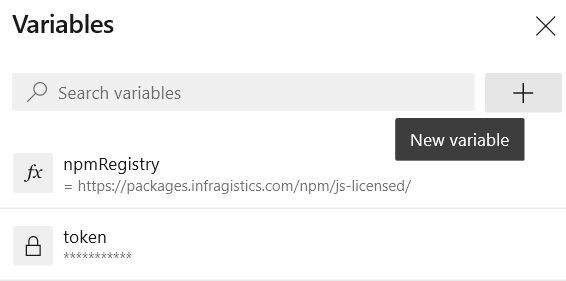
Travis CI Configuration
We will follow almost the same approach here. The only difference would be that the configuration will be set on before_install
before_install:
- echo "@infragistics:registry=https://packages.infragistics.com/npm/js-licensed/" >> ~/.npmrc
- echo "//packages.infragistics.com/npm/js-licensed/:_auth=$TOKEN" >> ~/.npmrc
The best way to define an environment variable depends on what type of information it will contain. So you have two options:
- encrypt it and add it to your .travis.yml
- add it to your Repository Settings
GitHub Actions Configuration
Add the following scripts before the **npm i(ci)*- step to your CI workflow configuration:
- run: echo "@infragistics:registry=https://packages.infragistics.com/npm/js-licensed/" >> ~/.npmrc
- run: echo "//packages.infragistics.com/npm/js-licensed/:_auth=${{ secrets.NPM_TOKEN }}" >> ~/.npmrc
Define secrets (encrypted environment variables) and use them in the GitHub actions workflow for sensitive information like the access token.